When it comes to generating AI images using stable diffusion a new alternative has gained the popularity in the market and that is Fooocus AI. With a not-so-complicated user interface, Fooocus AI provides somewhat similar functionalities as Automatic1111 and ComfyUI.
Let’s see all the functionalities of Fooocus and its options in detailed use-case examples. We have explained how choosing the option in wrong manner can make your image worse and shared tips and tricks to get the perfect output. But, for that first, you need to download and install Fooocus into your machine or Cloud.
Requirements:
1. 8GB RAM
2. Minimum 4GB GPU (more than 6GB recommended)
3. Nvidia RTX 3000/RTX 4000 series
4. Windows/Linux OS, (MAC runs it at a slower speed)
Functions of Fooocus AI:
1. Generating Image using prompt:
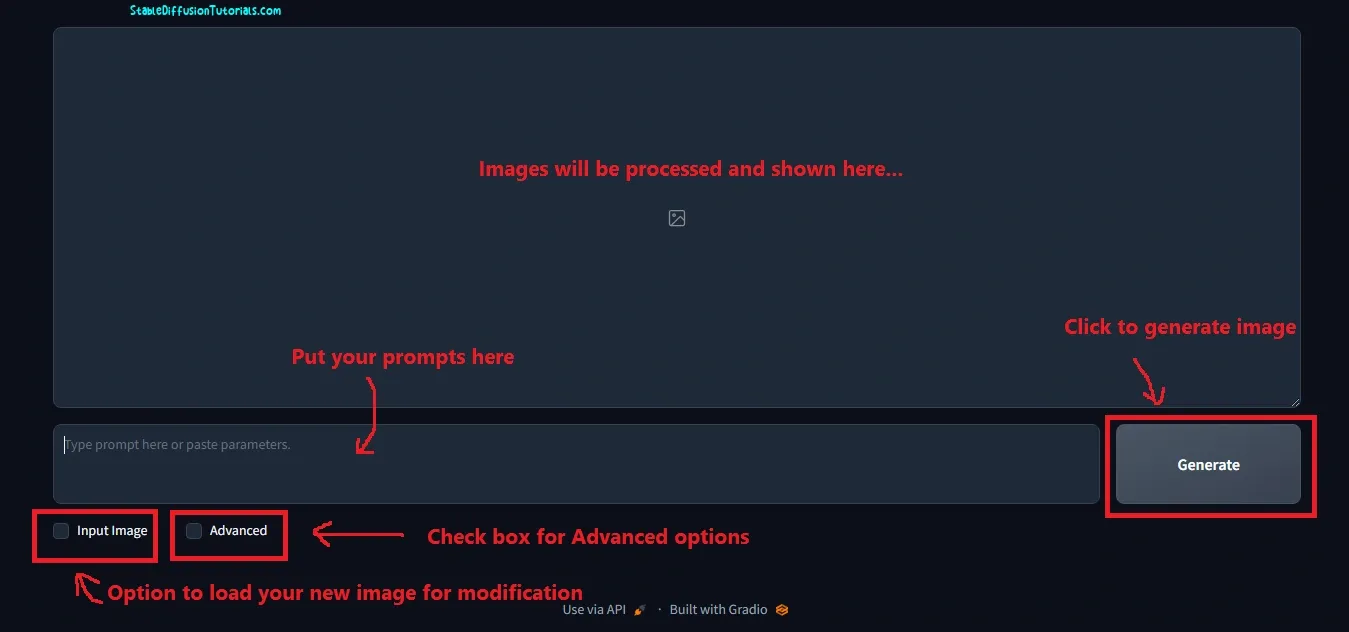
1. When you come into its dashboard, you will see a large canvas where you can drag and drop the image you want to work on, or a new image will be generated when you feed your positive and negative prompts.
At the bottom, a wide box will be available used for feeding the positive prompts. Quick simple, easy-to-use interface with minimal options.
2. Now, if you want to work on your image for modification like Inpainting, Upscaling, or Outpainting then at the most left corner a check box will be available “Input image” helps to load your image.
To work with advanced options then, a check box option “Advanced” also has been provided. If you check that box, a new option will open with multiple advanced options on the right side of the dashboard.
3. At the top, there are three options:-
(a) The speed option sets the minimal effects with optimized settings for the fastest image generation.
(b) Quality option used when a user wants to generate a quality image with lesser generation time.
(c) The Extreme speed option is for those who are professionals using powerful machines to generate the highest pixels of images.
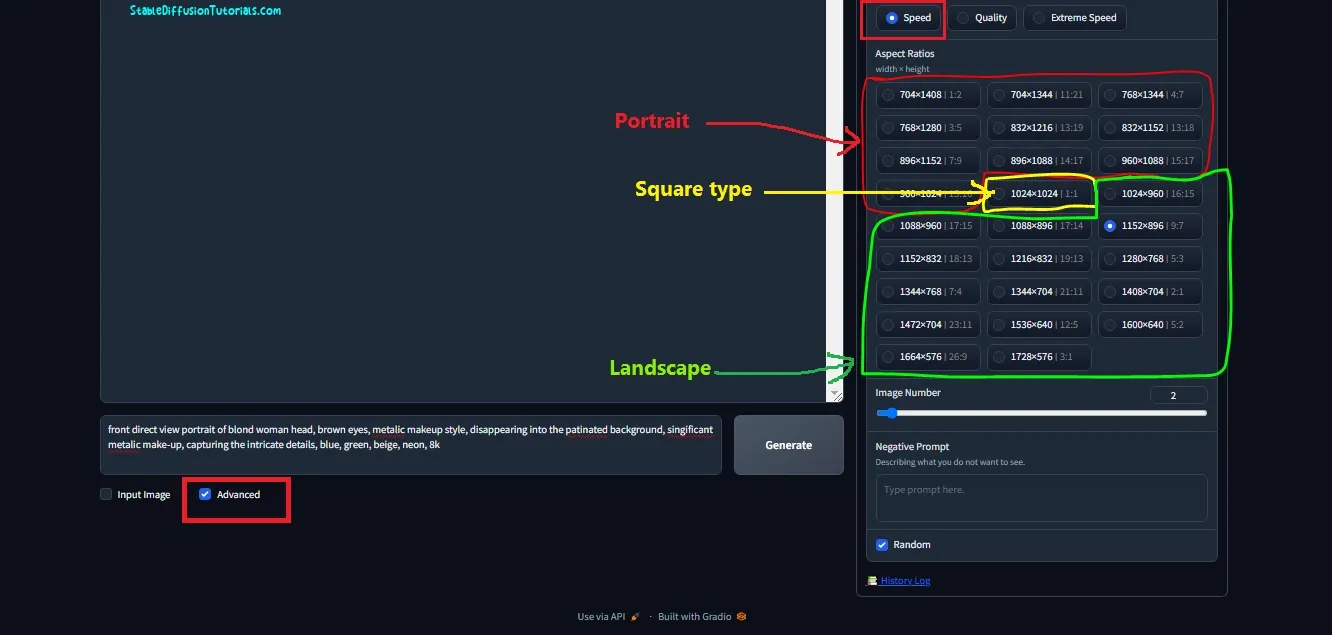
On the next, there are many aspect ratios, with direct pixel image size buttons for ease of use case have been provided. The first red section that we are showing is for portrait type, the next yellow colored for square type images, and the rest green colored section is for landscape type image generation.
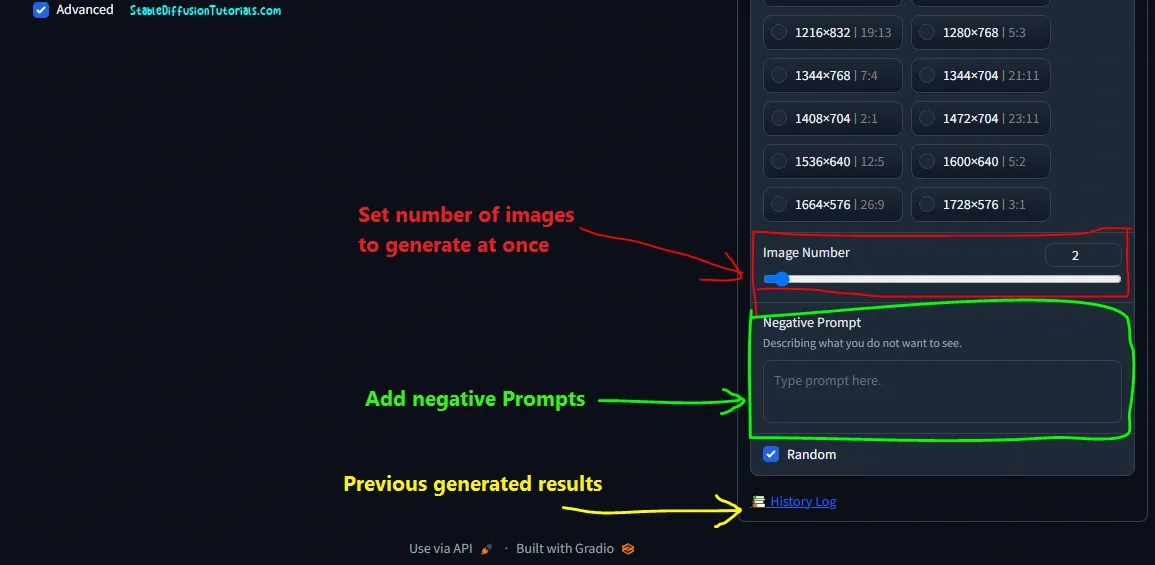
–Image Number: If you move to the next section, an Image Number option is there helps to set the number of images you want to generate at once when you hit the “Generate” button. It’s like Midjourney by default generates 4 images and Dalle 2 images at a time.
Remember, the higher the value the longer time it will take to generate a batch of images and vice-versa.
–Negative Prompts: Again, beneath this another option Negative prompts used to input the prompts that you do not want into your generating image art like low quality, ugly, deformed, etc.
–Random: This option is for setting the seed value process used to generate the image process. When checking this option it gives you different randomly generated images. But, when you want similar effects uncheck will give more accurate results with the same prompt. This option works like a charm when you want to generate consistent images.
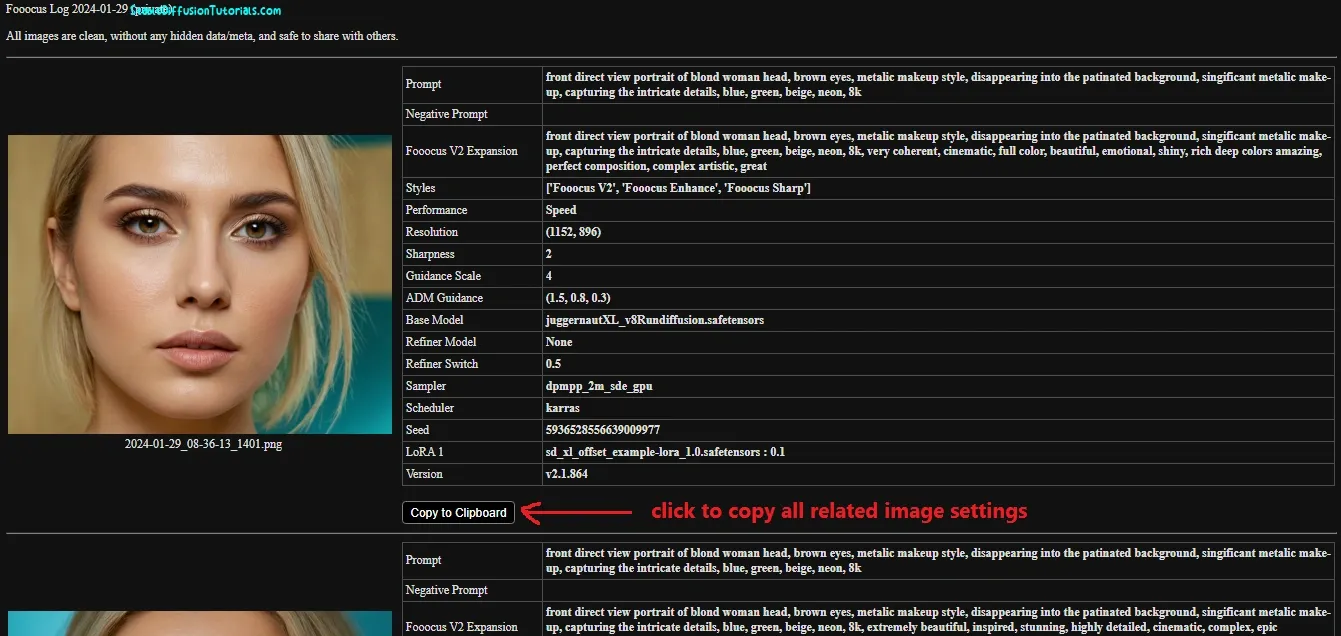
–History Logs: This option is very helpful when you are working in a team, or for a community and want to share your generated settings with them. This helps to directly copy all the settings like Guidance scale, type of model used, Positive prompts, negative prompts, etc. which you have been using while generating an art.
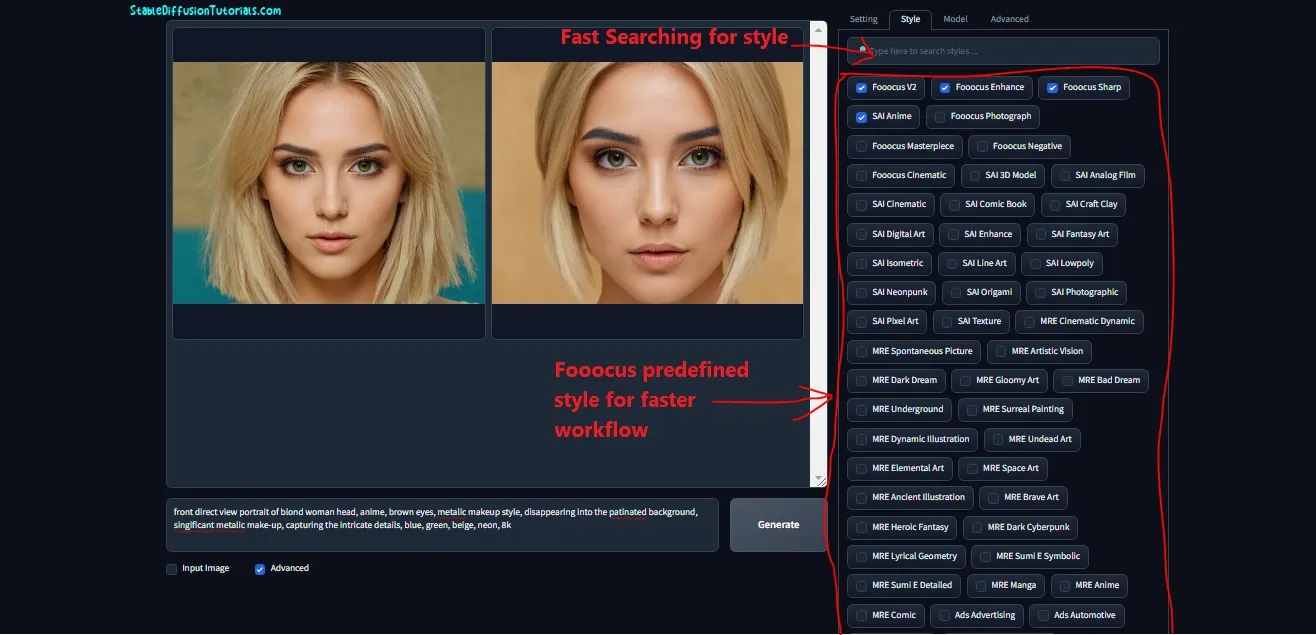
Style tab: Foocus AI provides multiple image art style which are already designed by them so that with one click you can generate the same art with simple selection.
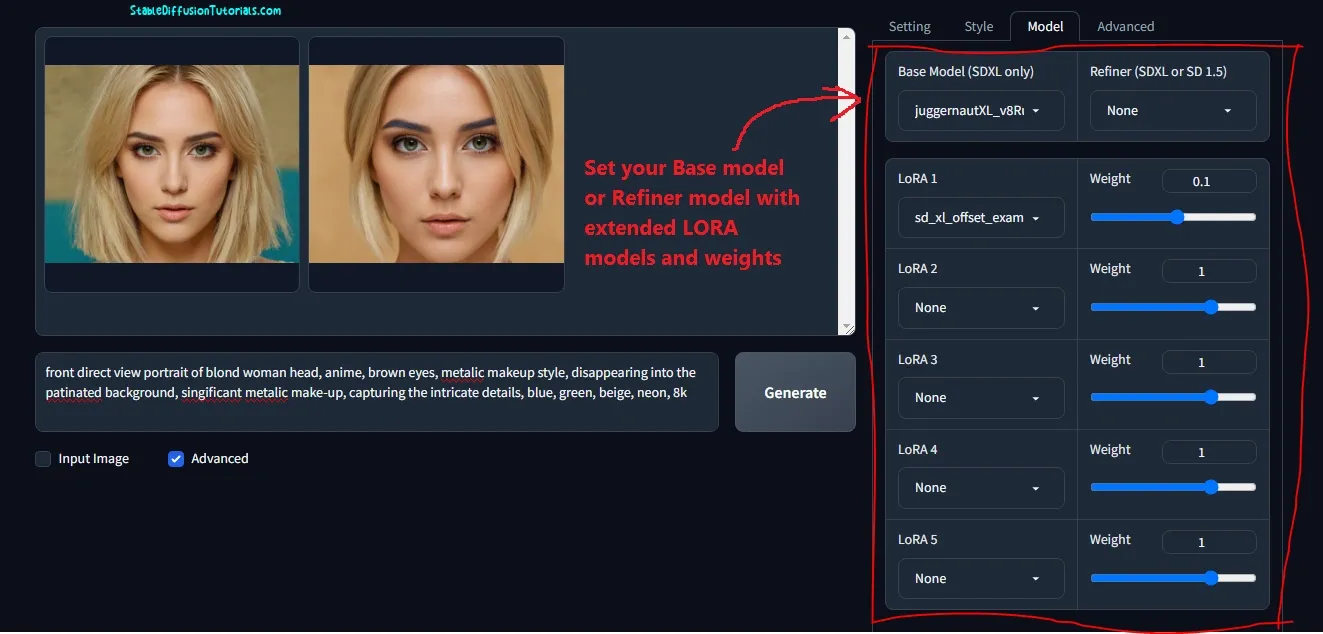
Model tab: You can choose your base models like Stable Diffusion XL 1.5, or Stable Diffusion Refiner. By default, Fooocus AI downloads and installs the Juggernaut model which is the pre-trained Stable Diffusion XL base model.
The Stable Diffusion Refiner model helps to generate more detailed images by adding high texture, clear edges, sharpness, etc. But, today, SDXL models it’s not really needed because these models have pre-added these features.
Not only this, but you can also use multiple Lora (fined-tuned models) with different weights-enabled slider options. here, the weights slider decides how much LORA effect you want in your generated image.
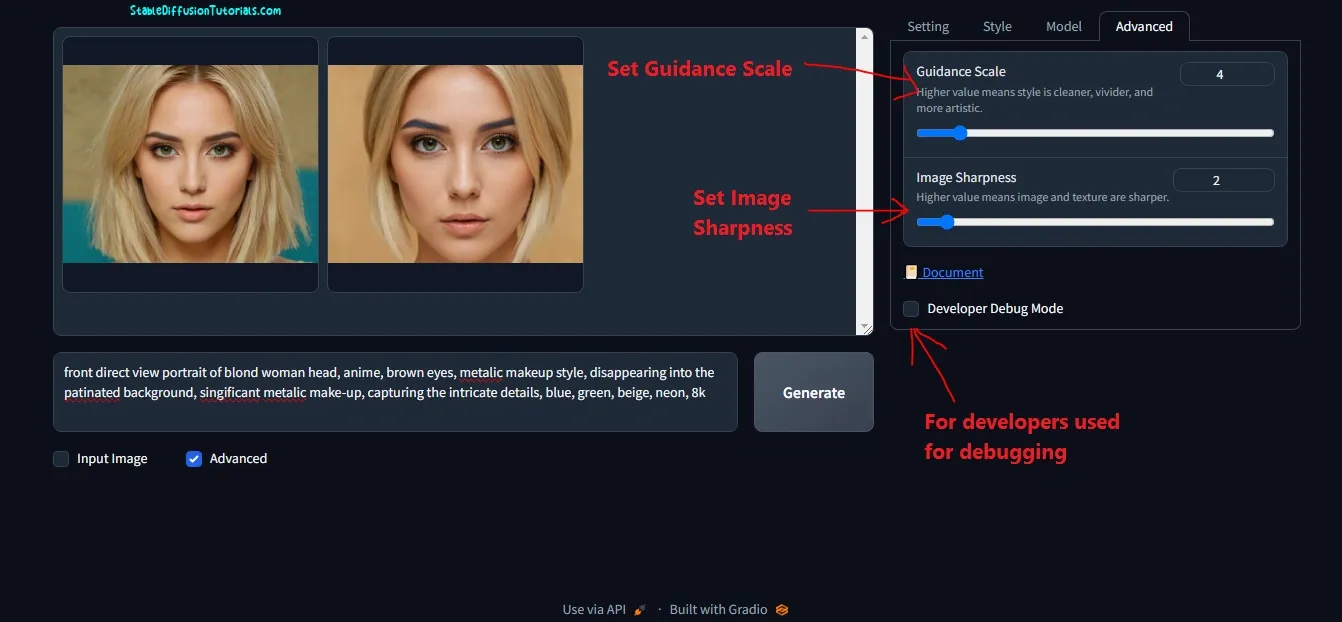
Advanced Tab:
(a) Guidance scale also known as the prompt weight instructs the AI models with the prompt you feed to how closely the detailed influence you want for generating an image. It’s like controlling the AI models for more sophisticated accurate results using the positive and negative prompts.
A higher scale is used when you want professional results with detailed inputted prompts. It is recommended to work with a higher scale if you are a professional AI image creator.
(b) Image Sharpness helps to generate, sharp, clear edges with highly detailed images. Setting it to lower produces lower, blurred, smooth edges and vice-versa.
2. Upscaling concept:
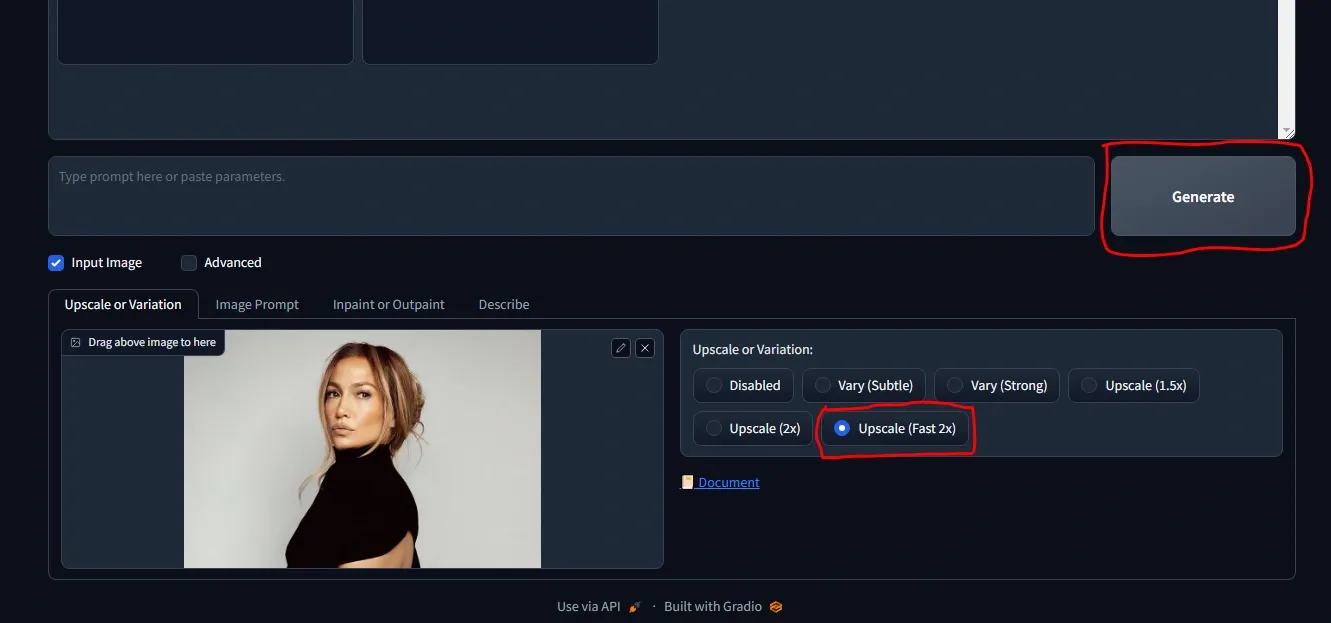
| This is the uploaded image in 828 by 552 pixels. |
| This is the generated output with 2x upscaling in 1656 by 1104 pixels. |
| Using the 1.5x up scalar the subject has been effected. |
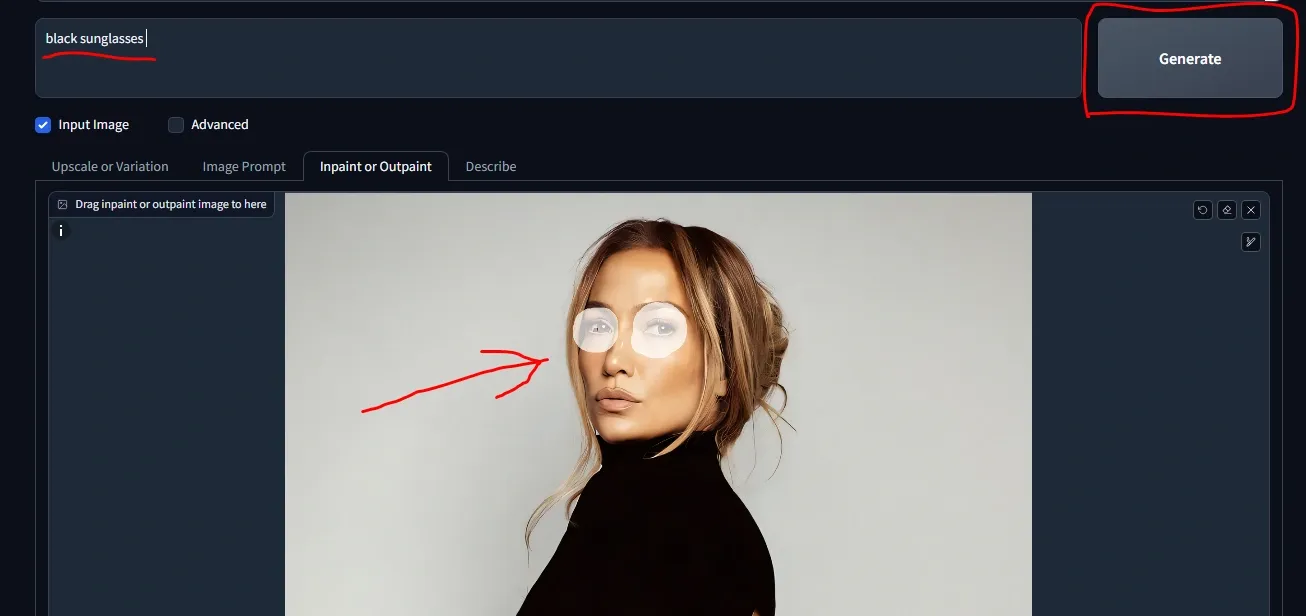
3. Inpainting concept:
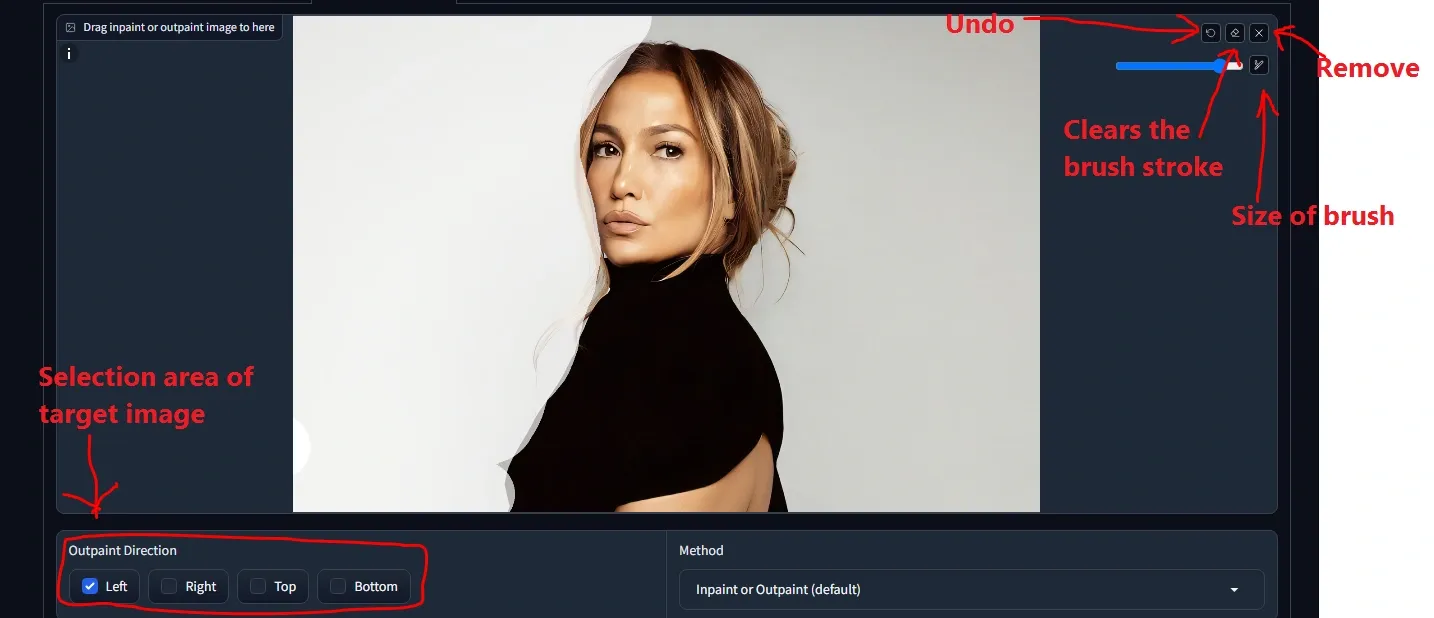
4. Outpaining concept:
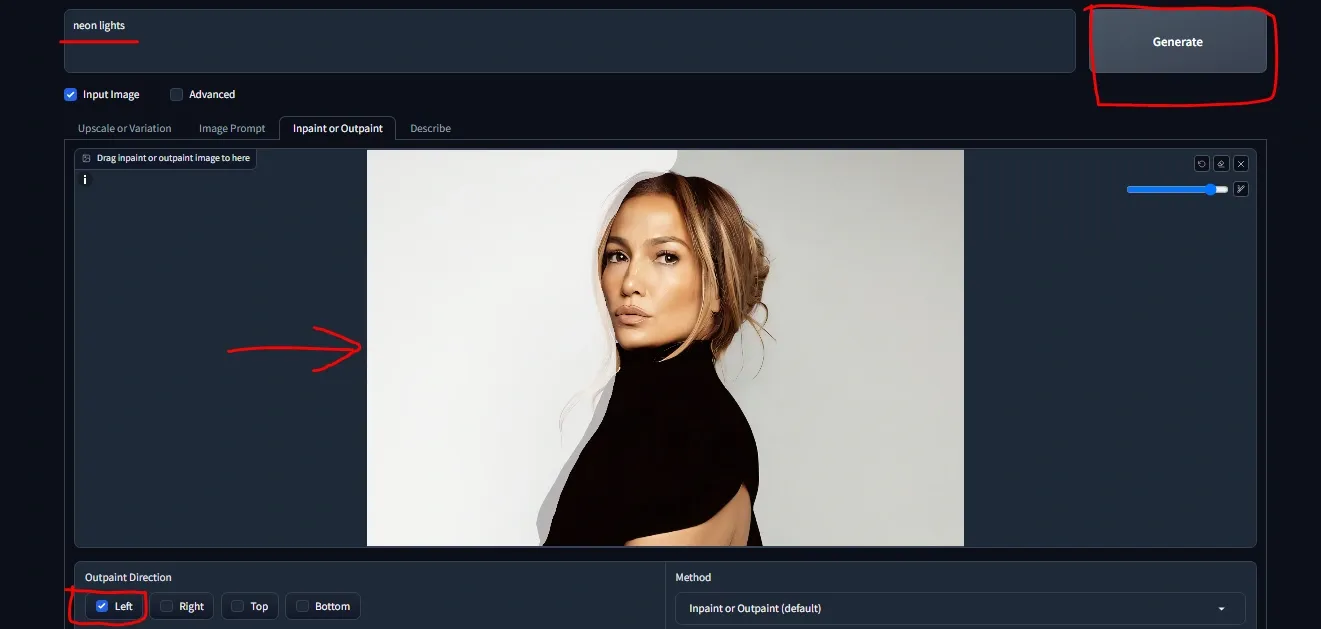
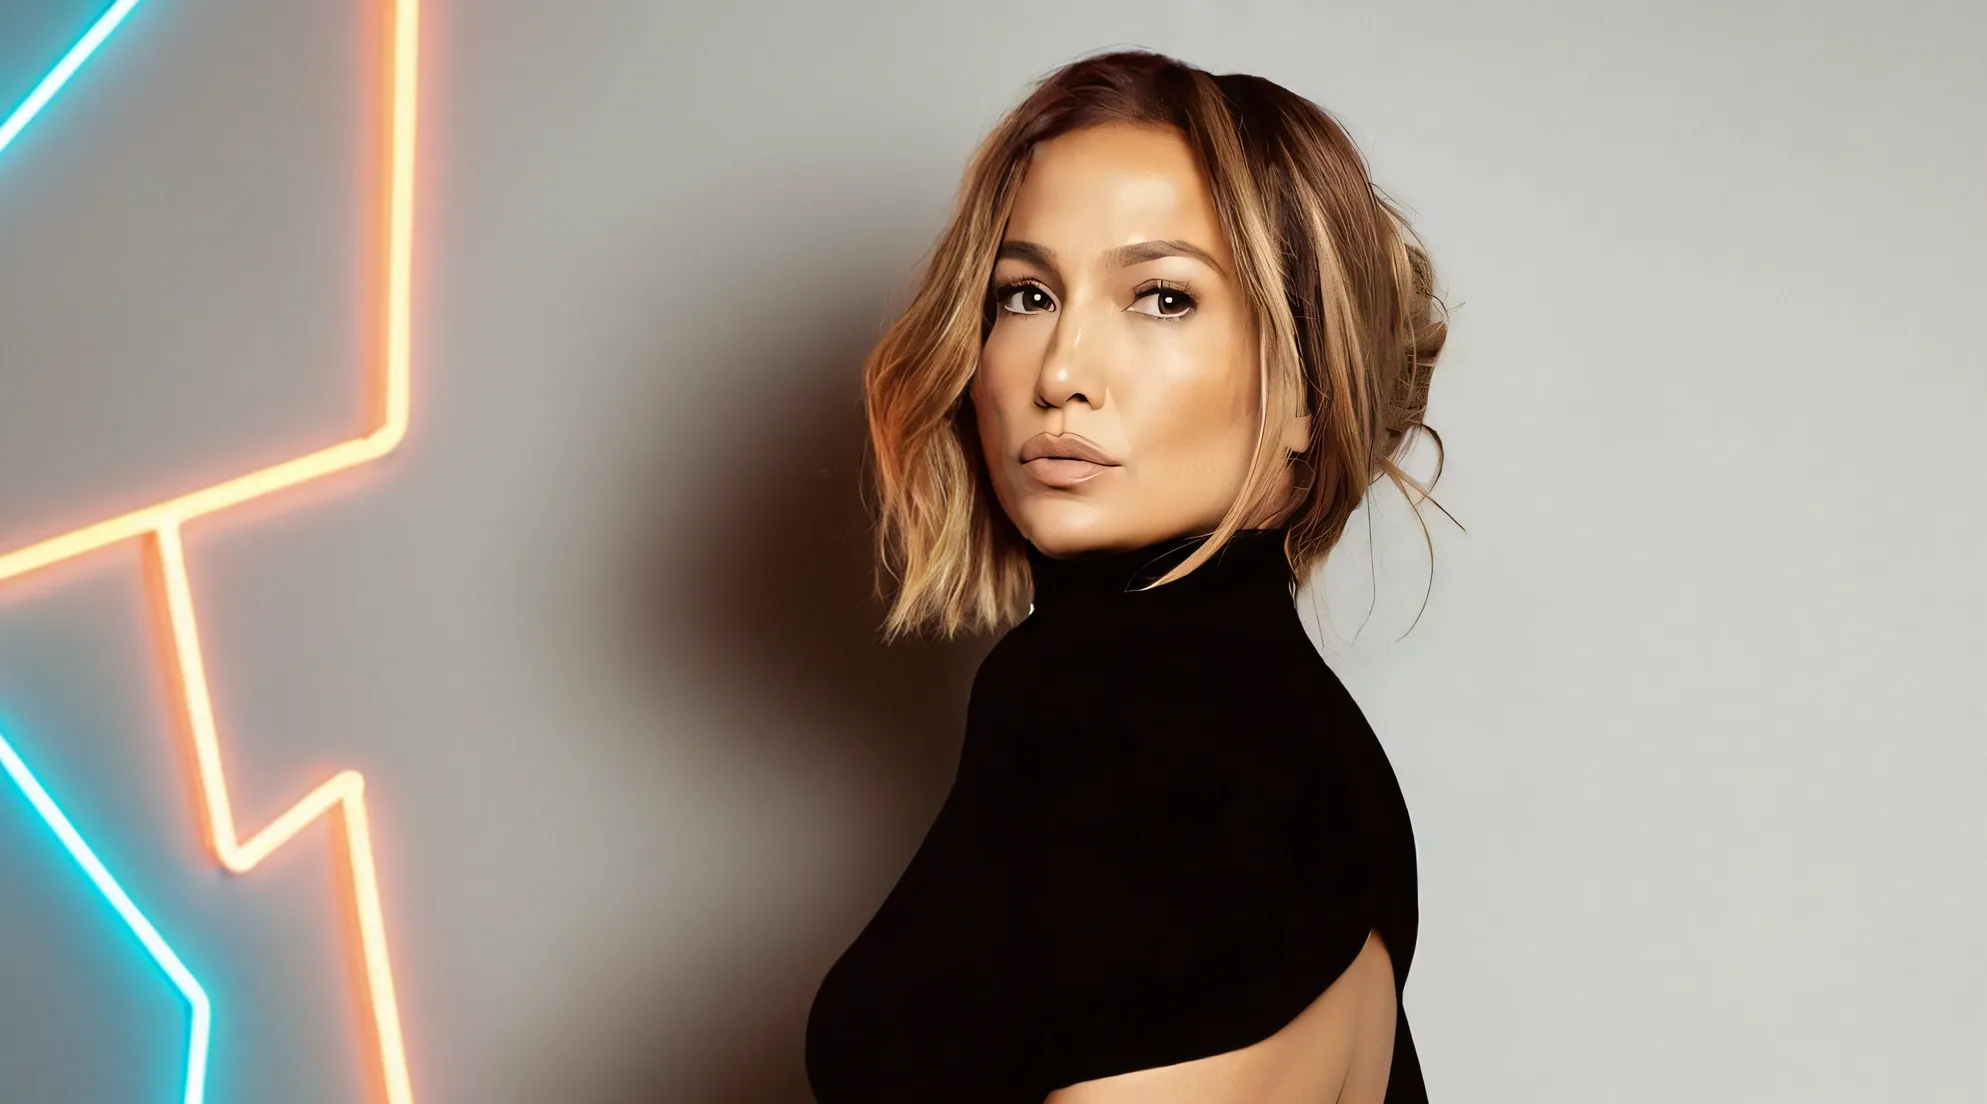
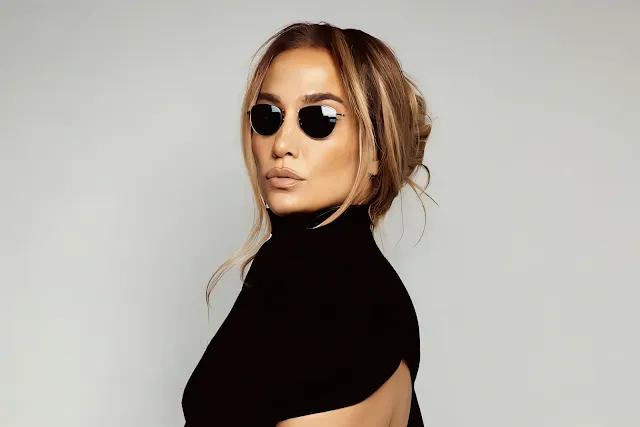
So, take it into mind to choose the area with precision while doing Inpainting or Outpainting.
Conclusion:

