In the field of image generation, we have Stable Diffusion with Automatic1111 incredibly beating and giving cut throat competition to MidJourney, OpenAI’s DALL-E, and Bing Image Creator.
In this post, we will help you with the process of installing Automatic1111 WebUI locally, so you can start creating awesome images from your textual prompts.
To generate quite good Prompts, you can use our Stable Diffusion Prompt Generator which will help you to generate tones of AI image prompts. You also need to have the basic knowledge that we have already discussed in other tutorial but, first of all let’s do the installation part.
Installing on Windows:
1. First things first, let’s install Git. Head over to the
official Git website and download and install Git for Windows
2. The next step is to
download and install Python. It’s recommended to install
Python 3.10.6 otherwise you will face multiple errors. Remember to select the “
Add Python to PATH” option during installation.
If you are running Python version other than 3.10.6 then its recommended to uninstall it and reinstall the Python 3.10.6. For uninstalling, just move to control panel and search python to uninstall it.
3. Move into any drive where you want to install Automatic1111(in our case its D drive) and type “cmd” into address bar to open your command prompt.

On your command prompt window, just copy the following command, paste and press enter to start installation:
git clone https://github.com/AUTOMATIC1111/stable-diffusion-webui.git
This will take few minutes to clone the official repository into your machine as it depends on your internet speed.
4. Time to download the models. Head to
Hugging Face and sign up.
Here, you will get 2 models that are “v1-5-pruned-emaonly.ckpt“around 4GB used for creating images (uses less VRAM). But if you want to train your own model and upload it into the community then you need another model named “v1-5-pruned.ckpt” around 7GB(uses more VRAM).
Download other Stable Diffusion models from the following tutorials listed below:
- Stable Diffusion XL(SDXL) 1.0
- Stable Cascade
- SDXL Lightning
- Stable video Diffusion
- Stable Diffusion 3 (coming soon)
5. After downloading just move the downloaded file into “stable-diffusion-webuimodelsstable-diffusion” folder.
You will get a file named “Put your stable diffusion checkpoints here“. So, there just drag and drop into it.
Now rename the file into “model.ckpt” otherwise your Automatic1111 WebUI will not work properly.
Now, if you are a windows user, then you need to enable the option “File name extensions” under Menu section otherwise you can’t rename the files with its extensions.
6. Again come back to “stable-diffusion-webui” folder. Open the webui (with .bat extension) file. This will again download some necessary prerequisites. So, be patient because it takes almost 5-10 minutes.
But don’t be tensed because this only takes for the first time after then wherever you will try to open Automatic1111 it will start instantly.
7. Once installation is complete, you’ll receive a local URL on the command prompt “http://127.0.0.1:7860/“ To access the stable diffusion WebUI just copy this link and paste it into your browser window.
http://127.0.0.1:7860
8. Enjoy Automatic1111 to create your image art generation.
Updating Automatic1111:
After heavy usage of Automatic1111, we were facing some kind of problems while updating this WebUI. Here, we have found and sharing an easy method way to make an upgrade. Using this method you don’t need to install Git and python again and again. Lets see how to do it.
Method 1:
1. First, move to your stable diffusion root folder and search for “webui-user.bat” file. Right click on it and open with any editor (like notepad or notepad++). We are using VS Code.
Here, you don’t need to confuse with your file because these(–medvram and –autolaunch) are optional. You can add these arguments or ignore. Make bigger images with –medvram and for Auto launching your WebUI use –autolaunch arguments.
Now, add “git pull” command between “set COMMANDLINE_ARGS…..” and “call webui.bat” like we have illustrated on the above image.
2. Now Save the file and start your Automatic1111. Whenever you try to open Automatic1111, it will help you to install the new updates from the Github official repo of Automatic1111. But, if you don’t want to update again and again and indulge in those delays then you can remove the “git pull” command and save it.
Method 2:
If you don’t want to do such long method which we have described above then another alternative shortcut is there for you.
1. Using the Git command, you can upgrade the Autoamtic1111. First, move to the installation “stable-diffusion-webui” folder.
2. Place your cursor into the address bar and type “git pull” and press enter. This will instantly open your command prompt and your Automatic1111 will be upgraded to the current version.
Changing the default server port:
Now, if you want to change the default server port from “http://120.0.0.1:7860” to something different in Automatic1111, add your custom port number (Example –port 6967 ) to the set COMMANDLINE_ARGS= section of the “webui-user.bat” file available in your “stable-diffusion-webui” folder. Also, make sure other services not running on that port.
Installing on Mac:
We guide you through the steps to install Automatic1111 Stable Diffusion
on your Mac, specifically for those equipped with the latest Apple Silicon (M1
or M2). We have tried with MacOs M2, and sharing what problems we faced while
installing and running.
1. First of all press Command key + Shift to open your terminal. A new window will be opened which is the terminal.
Or alternatively, you can also go to the search bar and type “terminal”.
Copy the provided command from the homebrew homepage, paste it into your terminal, and enter your PC password. And let Homebrew install the required packages. It takes a little bit of time to install. It helps to run Python code and set up the environment for it.
4. Now, after installation, a message will be prompted to you into the terminal window that you need to run these two commands otherwise you will get an error. Just do as it is.
5. Install and Update if you running older versions:
brew install cmake protobuf rust [email protected] git wget
This command will install the prerequisites if not installed, but if your system has older versions this will install the new versions.
6. Clone Stable Diffusion Repository. For that create a new directory on your PC for installing and keeping all the clone repository files in a specific directory (folder). In our case, we are creating a directory named “stable diffusion” in the documents folder.
7. Open your new directory and just open your terminal by typing “cd your-new-directory-path” like you are seeing above mentioned image. In our case, we have created a new directory for documents. So, we have typed “cd documents/stablediffusion”
Now just copy and paste the entire code provided below into your terminal and press Enter:
git clone https://github.com/AUTOMATIC1111/stable-diffusion-webui.bat

This will install and download all the necessary files into your newly created directory. Now, you can see a new folder generated called “stable-diffusion-webui”.
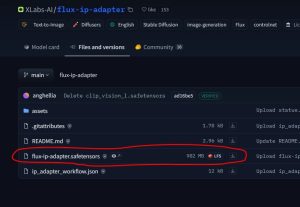
8. Download a Stable Diffusion model, such as version 1.5. By clicking on “Files and Versions“, move down and select the model. We have downloaded both with “.ckpt” file extension into our download folder.
Since the repository is trustable and maintained by StabilityAI, we can use .ckpt files without any hassle. Still, if you want then you can also use “.Safetensors” instead.
Navigate to the “models/Stable-Diffusion” directory in your cloned repository. You will see a file named “Put stable diffusion checkpoints here”.
Just drag and drop the downloaded checkpoints file into this directory.
Here, checkpoints are simply called the trained models which the community releases from time to time so that any AI artist can use it for their purpose. You can find these from Hugging face, CivitAI, etc.
9. In the terminal, navigate to the Stable Diffusion directory by typing this command:
cd stable-diffusion-webui
Launch this file by typing the command. This is actually the name of the file we need to run:
./webui.sh
Wait for the initial setup, which involves downloading additional packages. It takes almost 5-10 minutes according to your system configuration.
And at last, you will see that Automatic1111 has been installed into your Mac system. After installation, a local URL will be seen like this:
http://127.0.0.1:7860
 Just copy and paste the link into your browser to open your Automatic1111.

Now, just enjoy the power of Stable Diffusion on your local PC.
Installing on Linux:
1. First of all, install the required libraries that will be helpful for Automatic1111 to run:
For Debian/ Ubuntu based systems use this command to install prerequisites:
sudo apt install wget git python3 python3-venv libgl1 libglib2.0-0
For Red Hat based systems use this command to install prerequisites:
sudo dnf install wget git python3 gperftools-libs libglvnd-glx
For openSUSE based systems use this command to install prerequisites:
sudo zypper install wget git python3 libtcmalloc4 libglvnd
For Arch Linux based systems use this command to install prerequisites:
sudo pacman -S wget git python3
These commands ensure that the necessary tools and libraries are installed on your system, which are commonly needed for development and various other tasks. If your system doesn’t have these libraries it will install and if it has then it will update with the new version.
2. Move to the directory where ever you want to install Automatic1111 WebUI using cd command and then type the following command provided below to clone the repository:
wget -q https://raw.githubusercontent.com/AUTOMATIC1111/stable-diffusion-webui/master/webui.sh
3. Now, just run the file named webui.sh file.
http://127.0.0.1:7860
You will get a local URL shown on the terminal, just copy and paste on to your browser to open Automatic1111 Webui.
4. Enjoy the power of Stable Diffusion using Automatic1111 webUI
Conclusion:
Automatic1111 is the game changer WebUI brought revolution in the field of image generation. It basically depends on the Gradio Python library. With just a few clicks now you can run your image model and generate a wide variety of art, train your own model, and whatnot.
If you face any problem related to Automatic1111 errors then directly you can take help by raising your query in their
repository’s issues section.