Invoke AI is really doing better and better with time bringing lots of upgrades and advancement is quite helpful for the AI art community and now it’s one of the alternatives to Automatic1111 and ComfyUI as well. When it comes to generating AI images, they have made everything as simple as that a normal guy can also use it.
But, if you are new and searching for Invoke AI full workflow then, we are here to make your life simple and provide you each and every step in a detailed fashion.
Full Workflow of Invoke AI:
1. On the first installation, you will be directed to the model manager dashboard. For installing new models click on “Import Models“. This feature helps you to use any Stable Diffusion models(checkpoints):

(a) Using Automatic1111 models’ folder- If you are an Automatic1111 user then simply import all the models that you have downloaded to any specific folder, just move to that folder copy the path of the folder, and paste on the field of “Model Location” of InvokeAI.
But, if you have never ever used Automatic1111, then simply create a new folder and store all the downloaded models into it and use its path to load all into InvokeAI.
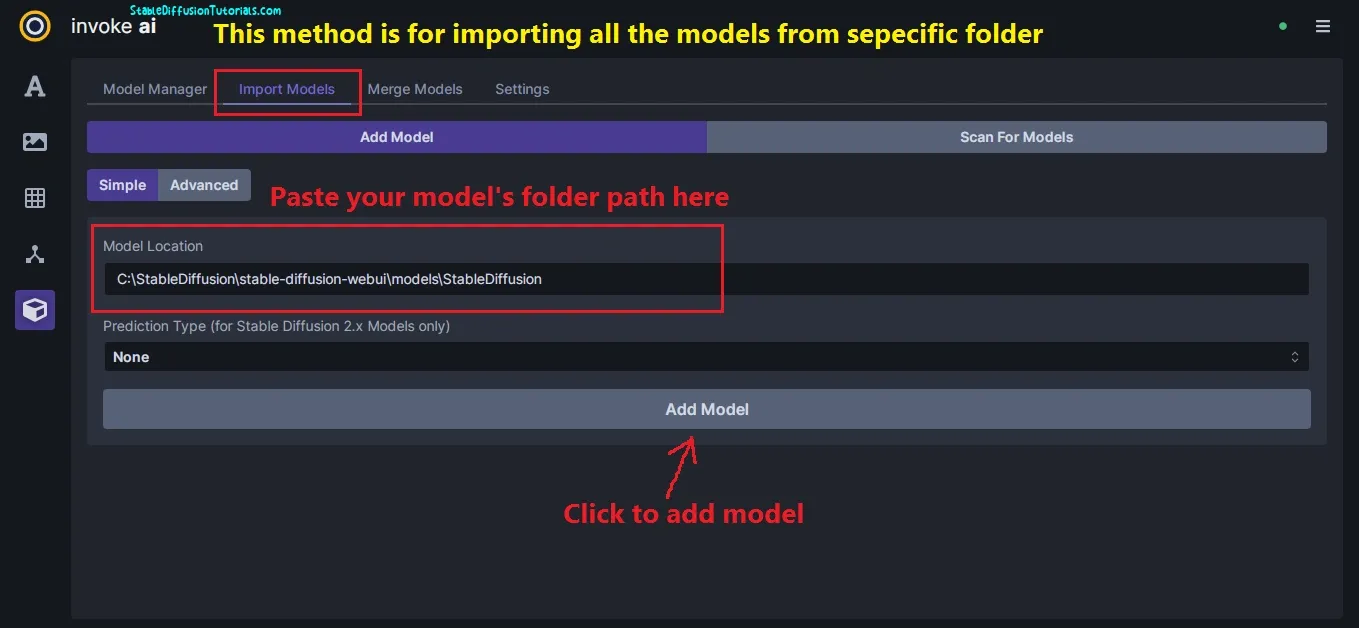
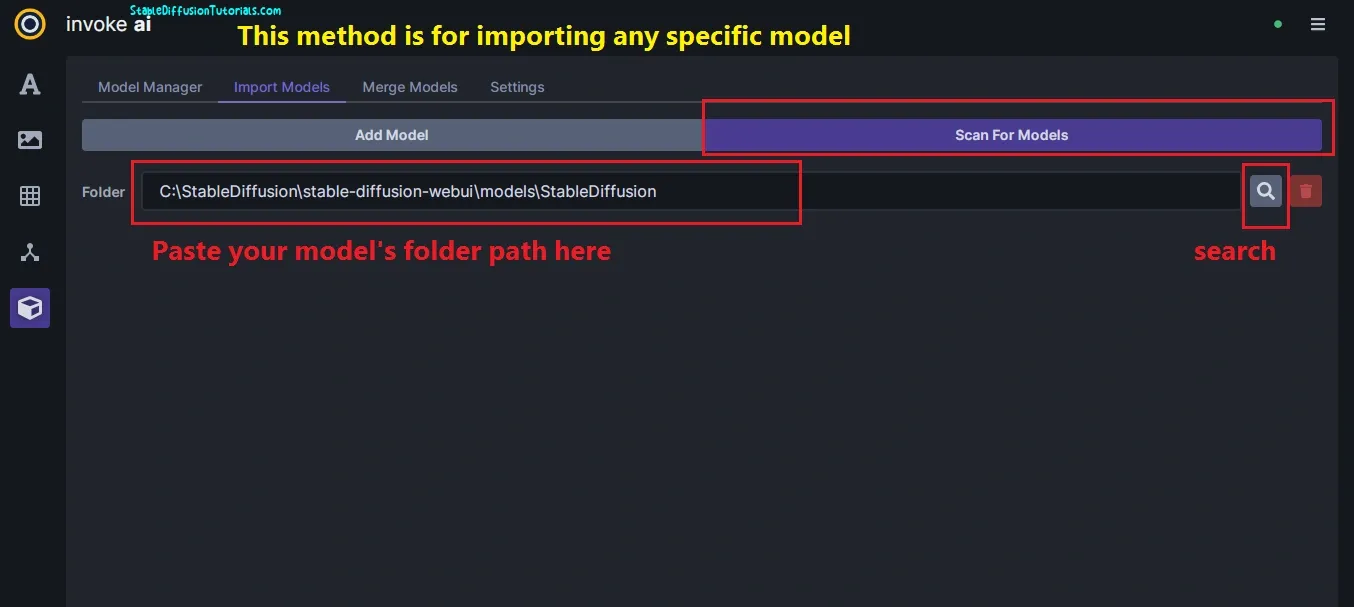
Select “Add Model” to load the models. But, if you want to load any specific model then select “Scan For Models” paste the model folder path, and click the search button. You will see all the model list, Click on the “Quick Add” button to select the specific model to get loaded.
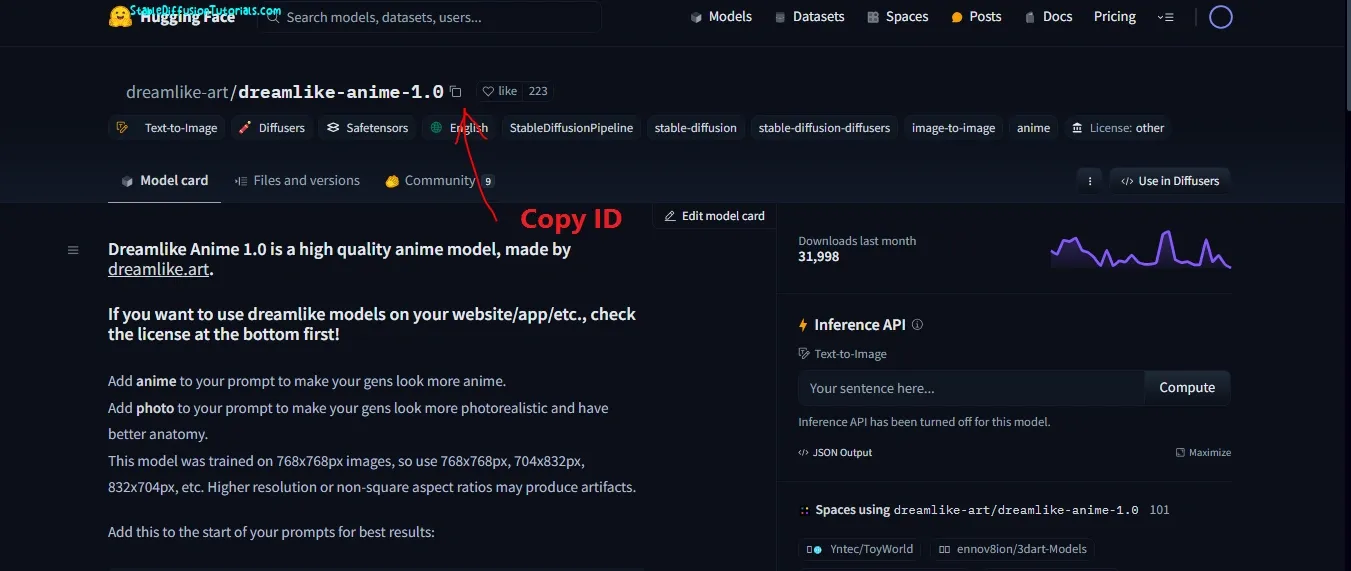
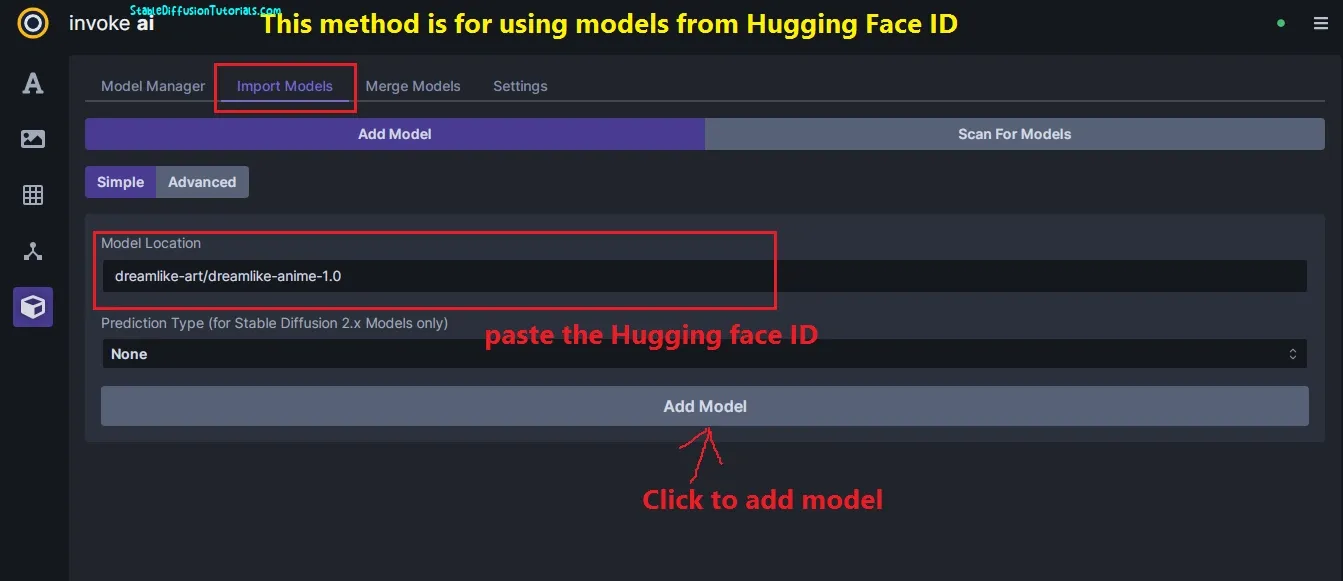
(b) Downloading Models from Hugging face- Go to the Hugging Face platform copy the Hugging Face ID and paste it into the “Model Location” field of the InvokeAI. For instance, we have chosen Dreamlike-anime-1.0 model, which you can search and select as your requirement.
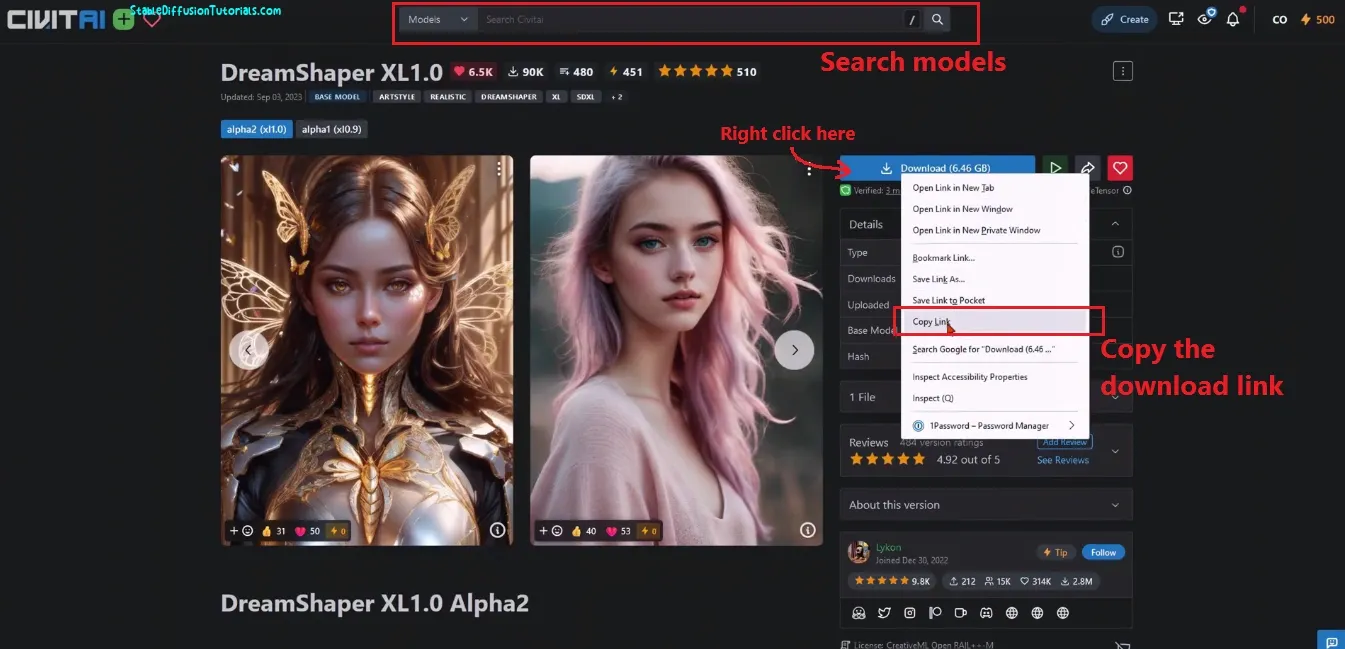
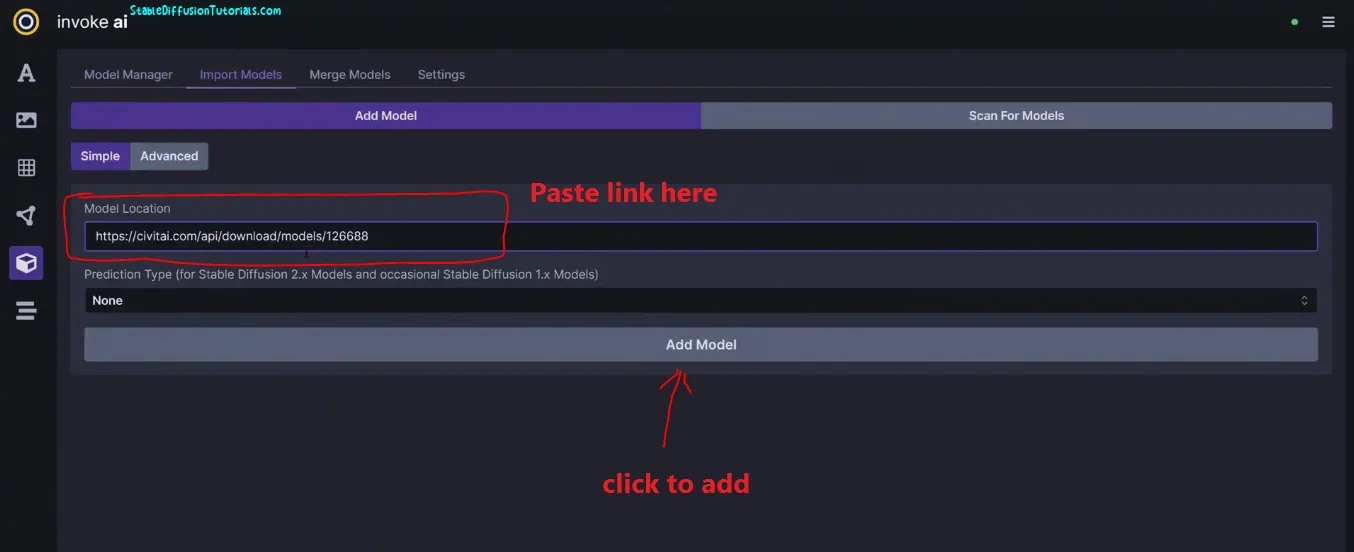
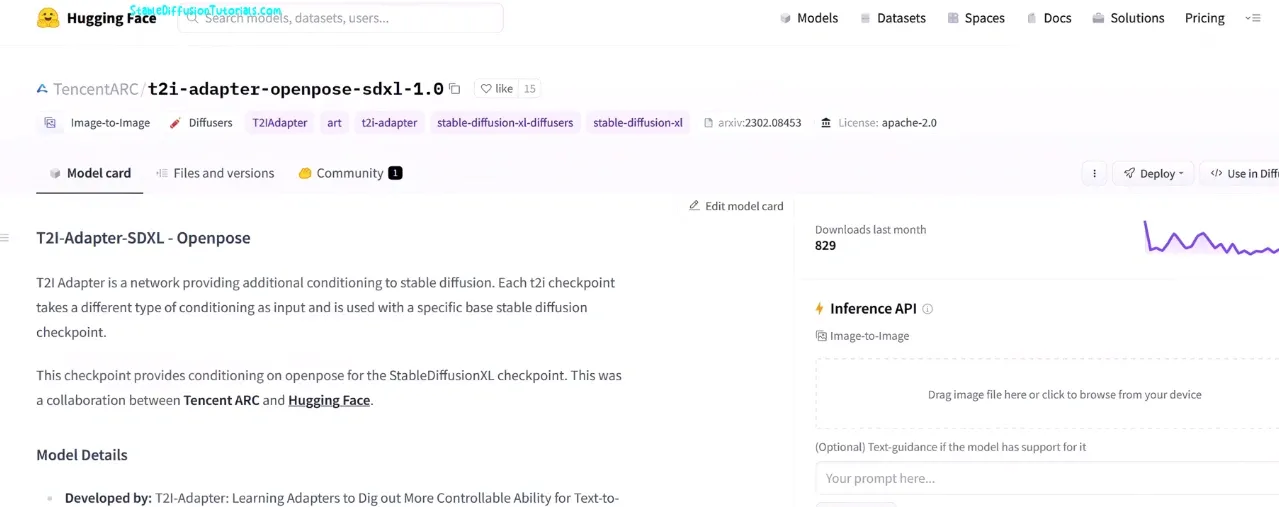
For the necessary models like T2I Adapter, LORAs, or ControlNet you need to search on the Hugging Face platform and download from there as we have illustrated in Step 1 (b) section.
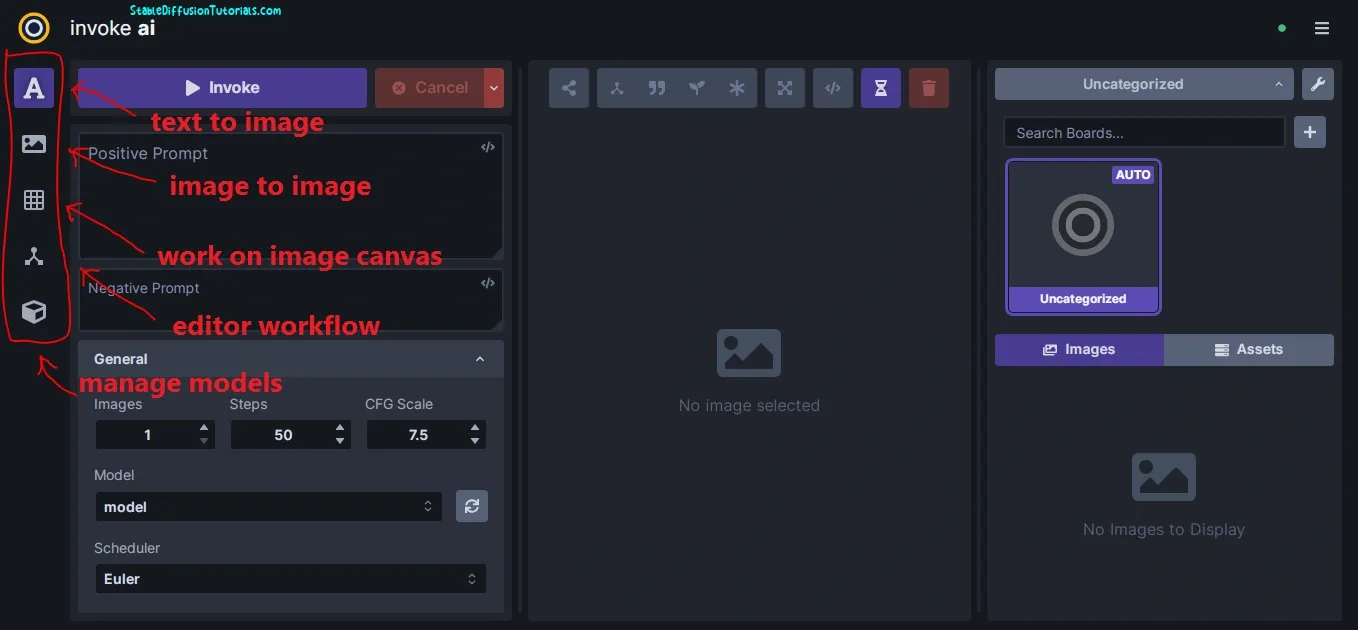
2. The sidebar has a menu bar with different options:
– Text to image: Helps to generate images by inputting positive and negative prompts.
– Image to Image: This option is used to work on image-to-image.
– Unified Canvas: Using this user can work on image canvas
– Workflow editor: This is to save the workflow in the form of JSON or nodes.
– Model manager: This helps to download and install the models’ checkpoints.
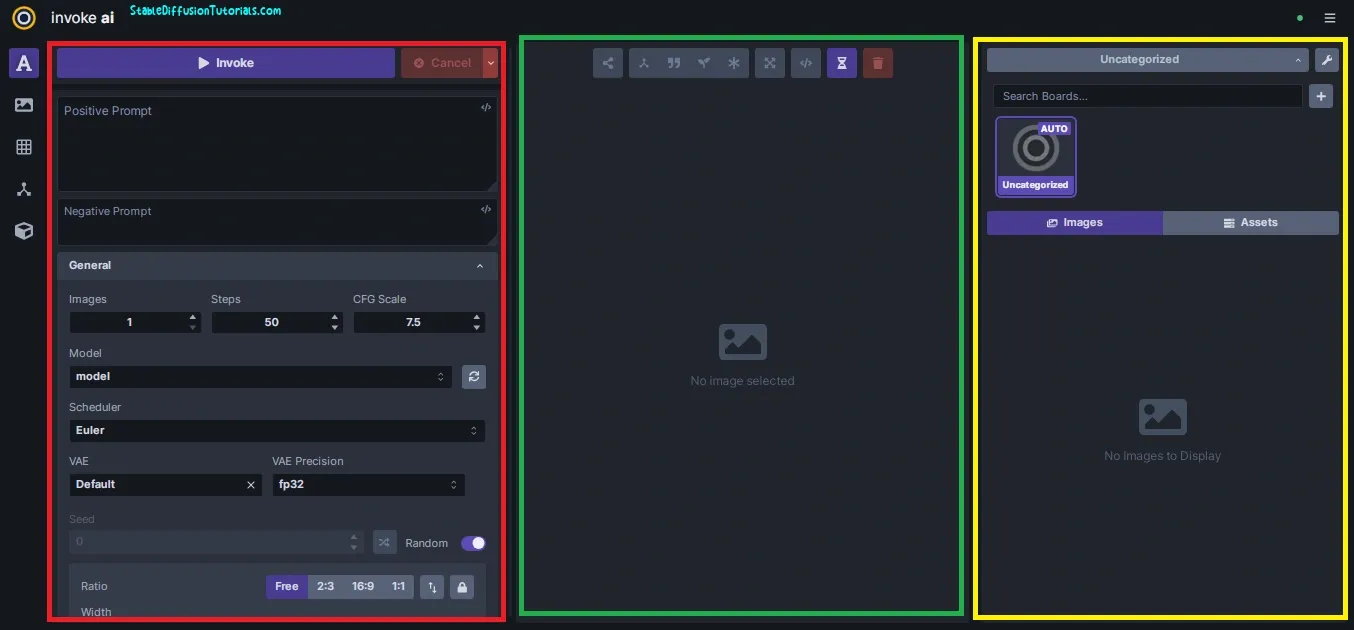
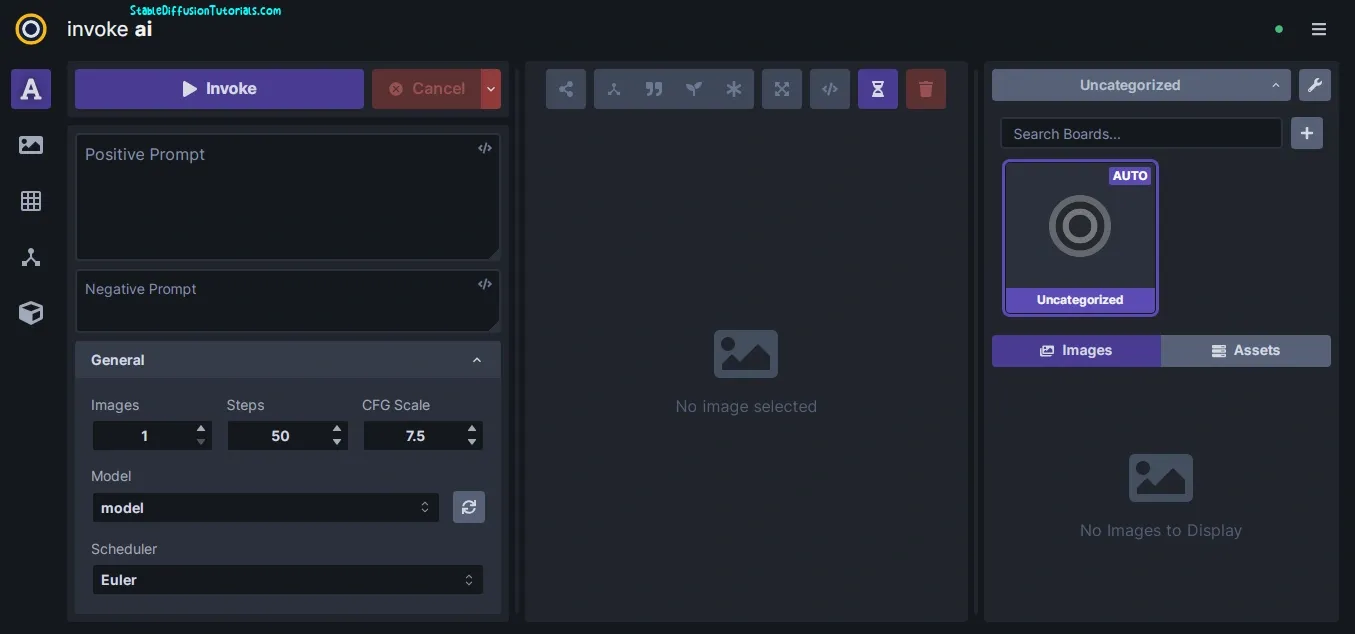
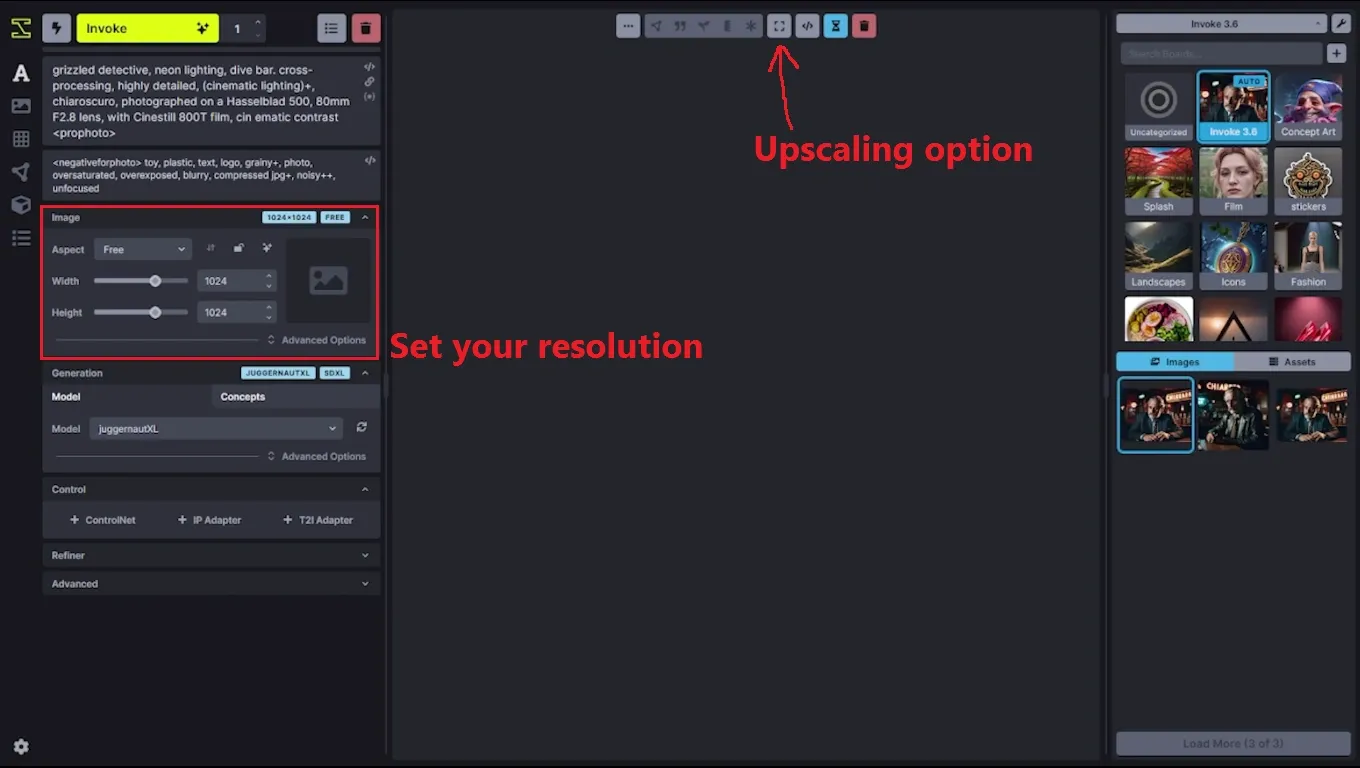
3. The dashboard is divided into 3 sections. The first is for inputting the positive, and negative prompts, selecting specific models, etc. The middle section is for showing the generated output with some effective settings like upsacalers, sharing, etc. and the last section is for the images you have generated and assets for future usage.
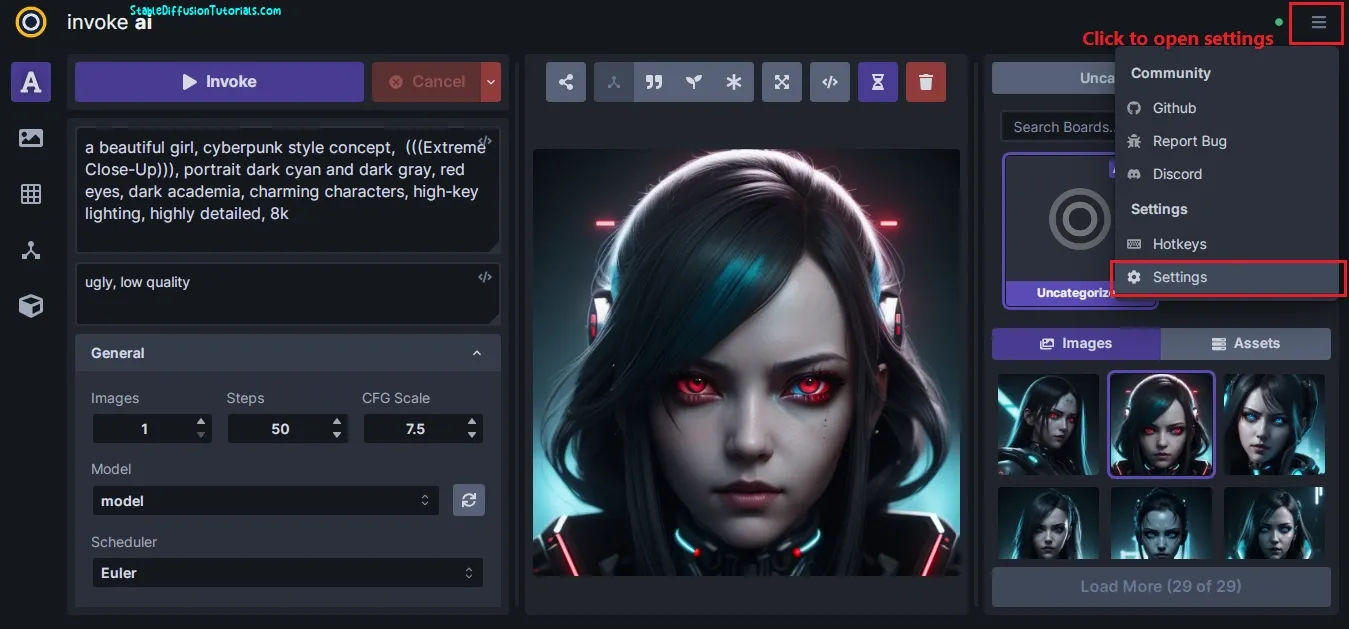
-For modifying the UI settings, you can select the option by clicking on the right corner of the dashboard.
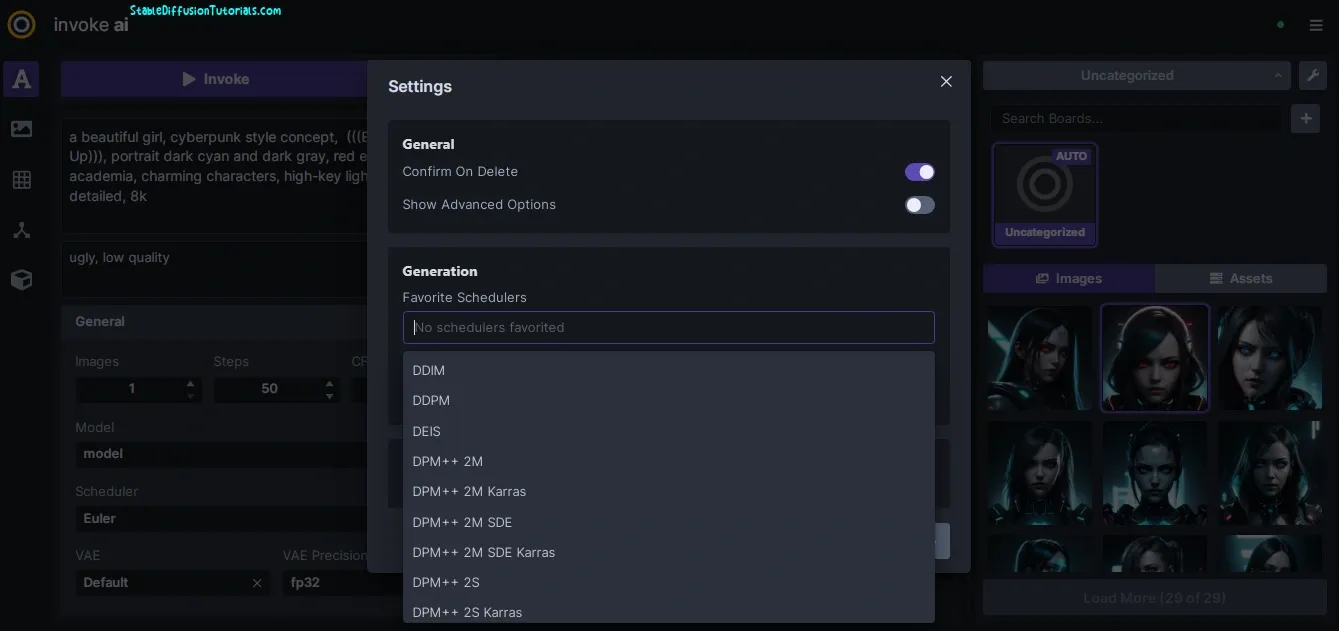
-You can add extra schedulers by selecting from here and it will be reflected on the left section of the dashboard under the schedulers option.
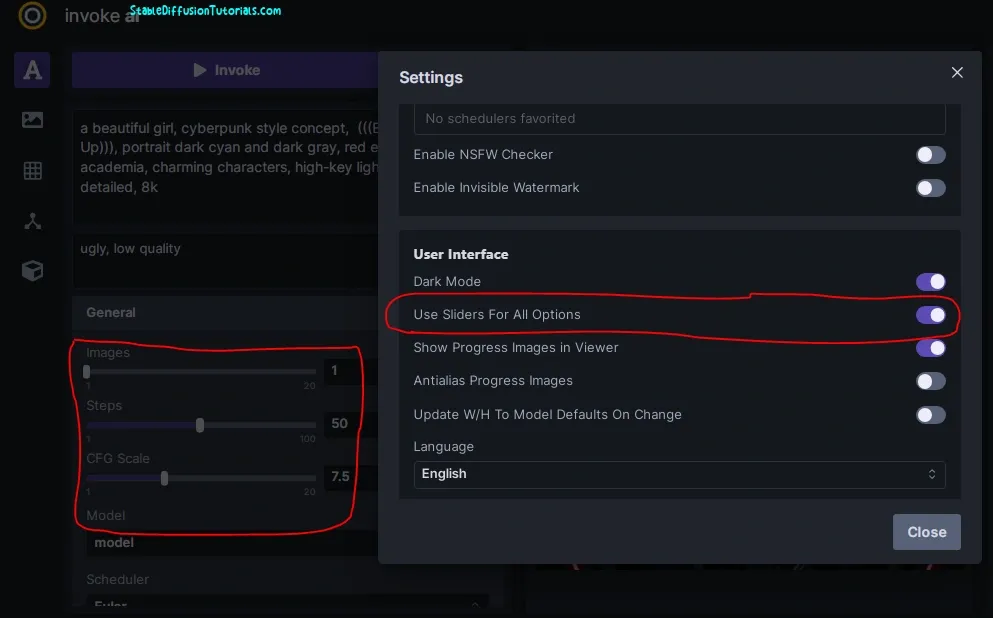
-Enabling the slider option adds the slider next to the input box helps to easily change the values in real-time.
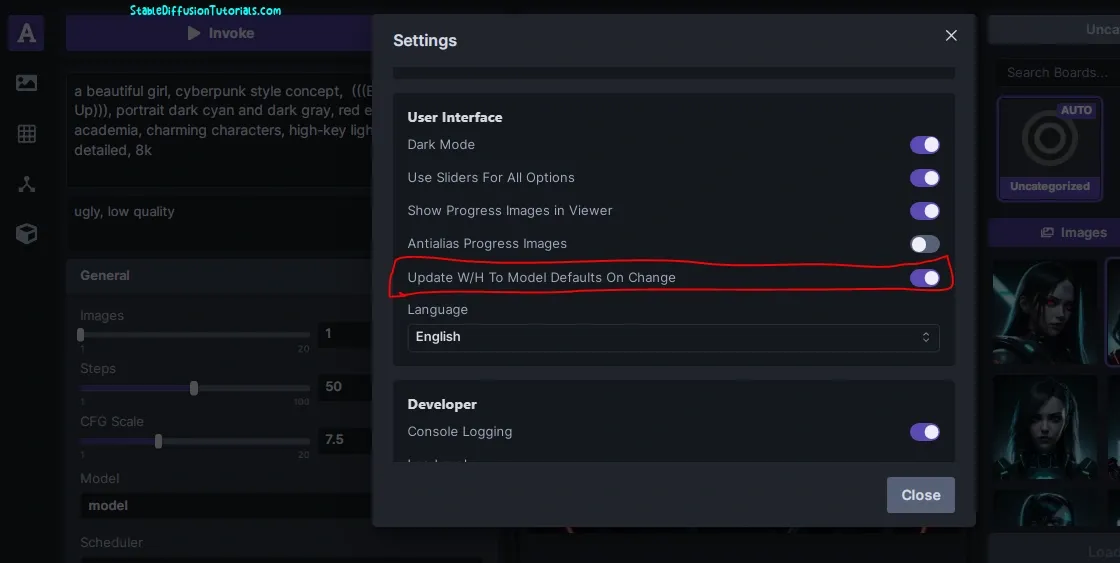
-This option is for changing the model and is useful if you are changing the checkpoints the default dimensions will automatically be selected helps to get the optimized output.
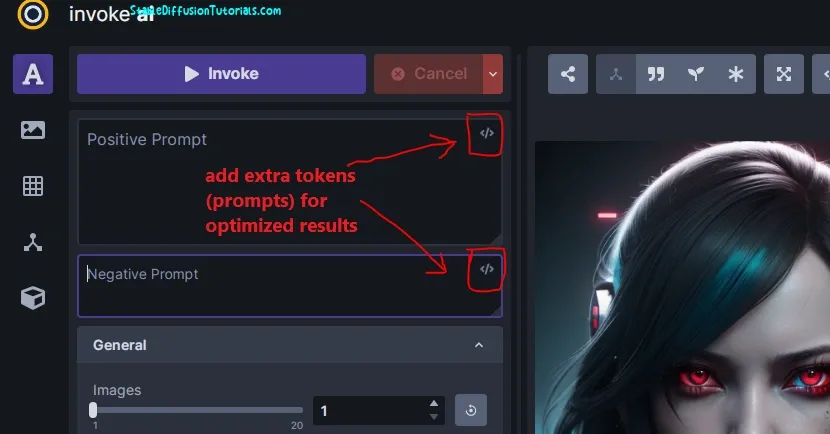
-For adding extra prompts embedding, you can do that by clicking on the corner of the positive and negative prompt box.
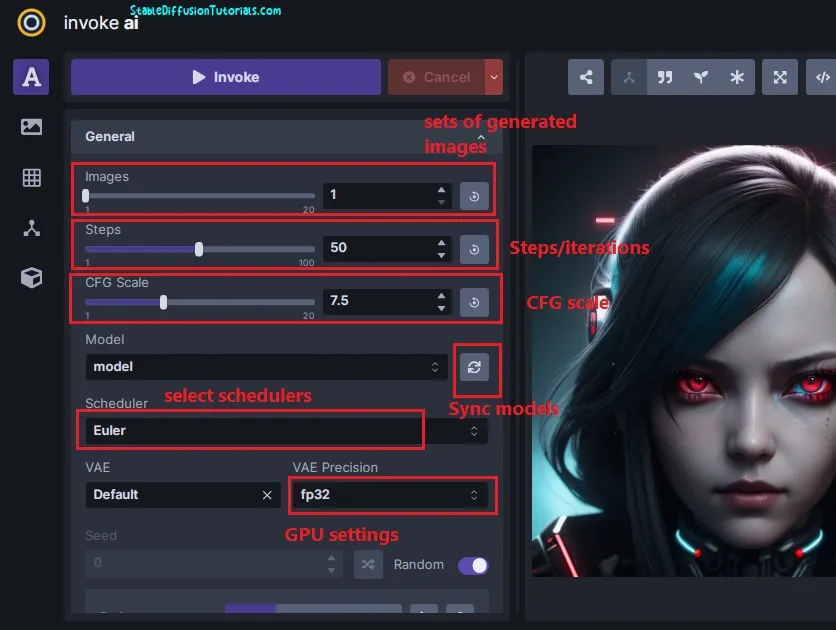
-This helps in generating a set of images at once when you click the “Invoke” button to generate image(s). Just like we use batch size in Automatic1111.
Steps are the iteration that a checkpoint model takes to generate an image. Setting to higher gives higher quality but takes a longer time.
-FP32/ FP16 (floating point) gets automatically selected for the supported GPUs. For newer GPUs, its recommended to use fp32, and for older ones fp16.
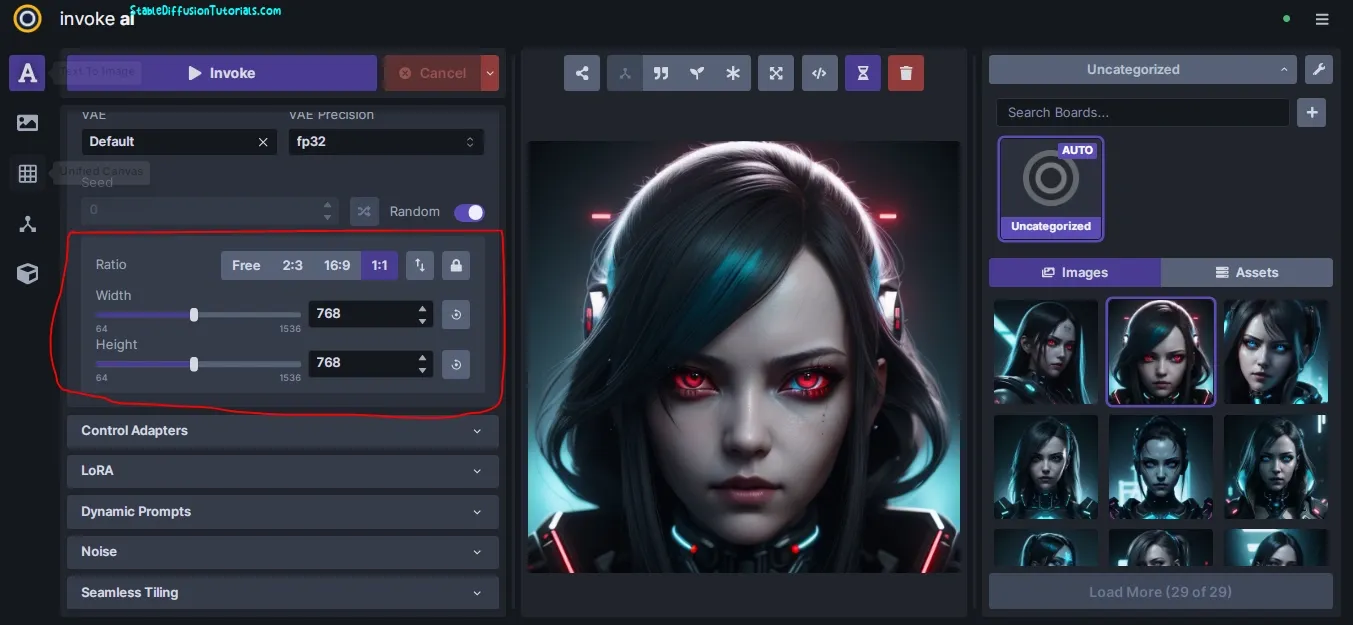
-Images can be generated with different ratios such as Free, 2:3,16:9, and 1:1 image resolution. You can also swap the height and width of pixels by clicking on the swap button. Like in the above example we have generated an image of 768 by 768 pixels by choosing a 1:1 ratio.
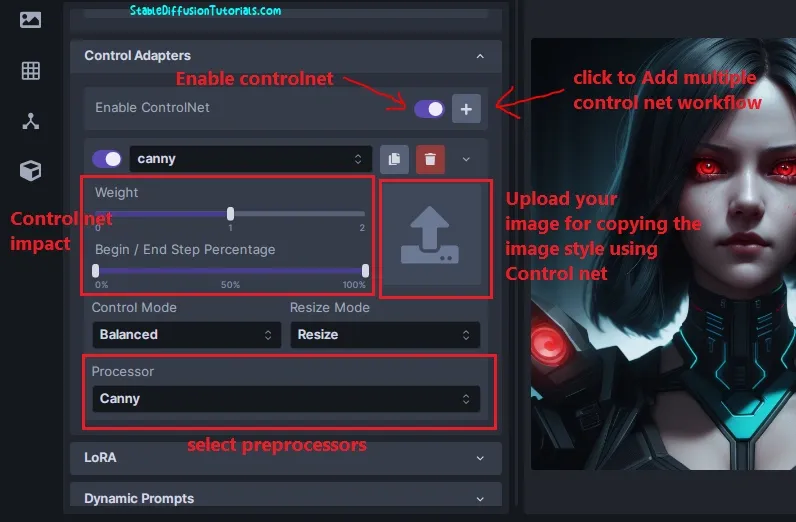
-Control net helps to copy the image style into newly generated images with different image preprocessor features by uploading the images. By the way, if you want to leverage its power then it’s recommended to take in-depth knowledge on ControlNet.
For downloading models like ControlNet, IP Adapter, and T2I Adapters it’s advised to download and install from the hugging face platform only.
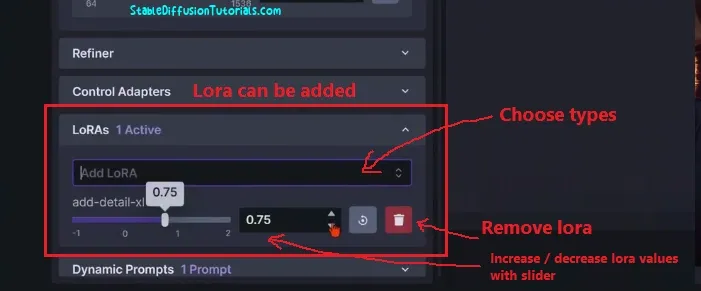
-Lora can be added by adding positive prompts, but for multiple frequent embedding, you can use this Lora option. This gives more ease to use with sliders with various Lora types.

-Enabling the CPU noise options forces the Invoke AI to use CPU instead of GPU but not recommended.
– Dynamic prompts divide your single prompts intelligently into multiple fragments helping diffuser models to under the inputted prompts better resulting in better output.
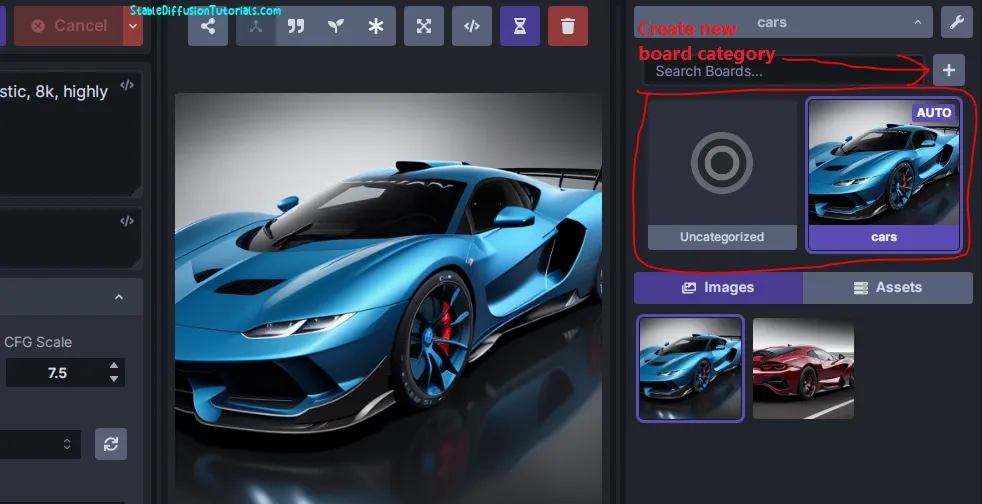
– By default, all the images generated get saved into the “Uncategorized” board (section). you can create different boards as your requirement and manage multiple workflows simultaneously.
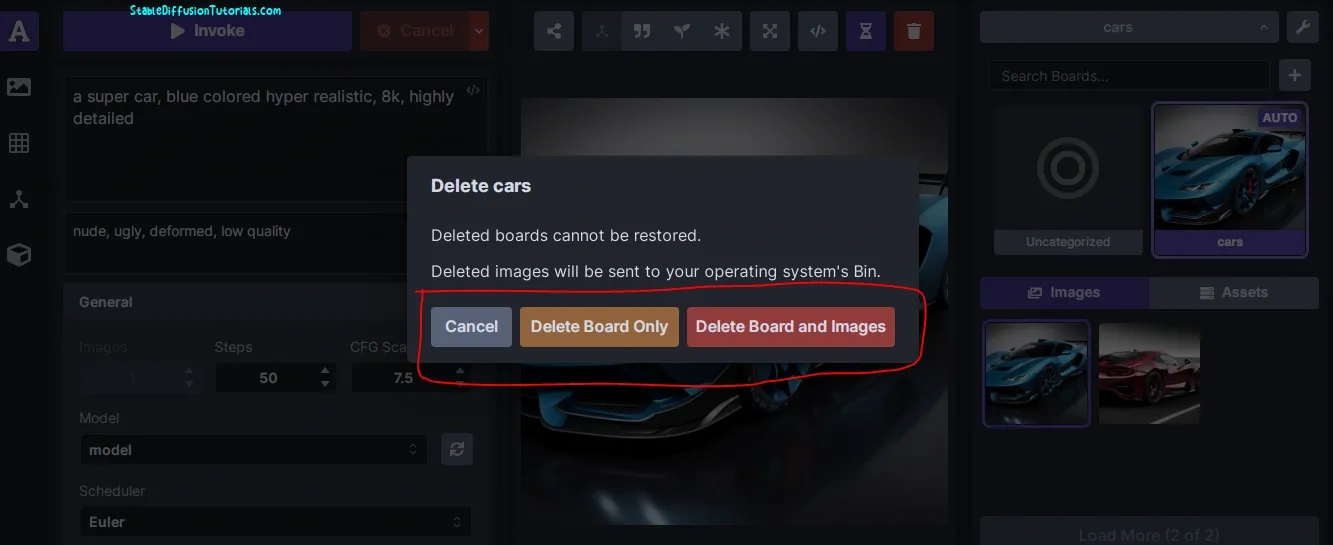
-In the above example we created a board named “cars“. You can select any generated images and drag-drop the image into a new board. For deleting any board just do a right-clicking on any board(with or without deleting the generated images) and a dialog box will appear for deletion.
Invoke AI provides a minimalistic user interface that can easily handled by the AI artist.
Here, we have discussed all the possible ways to handle Inpainting, Outpainting, and Upscaling in a more detailed and easy manner that a non-artistic person can learn with a simplified walkthrough tutorial in inpainting, outpainting, etc.
Steps to Outpainting:
Outpainting is an effective way to add a new background to your images with any subject. Invoke AI provides a cool feature for doing this. Let’s jump into the tutorial.
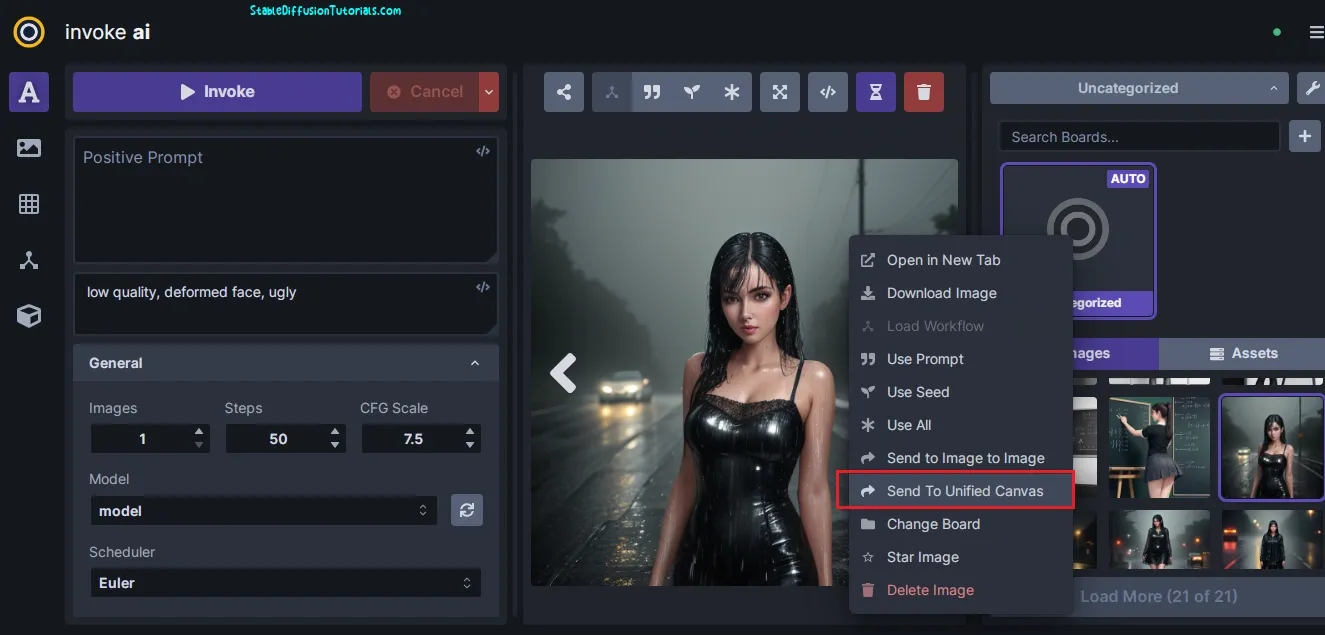
1. On the right, our team has generated a batch of images which you can see on the right panel on the above image. If you want any image to add to Unified Canvas, select any image using right-click and select the option “Send to Unified Canvas“.
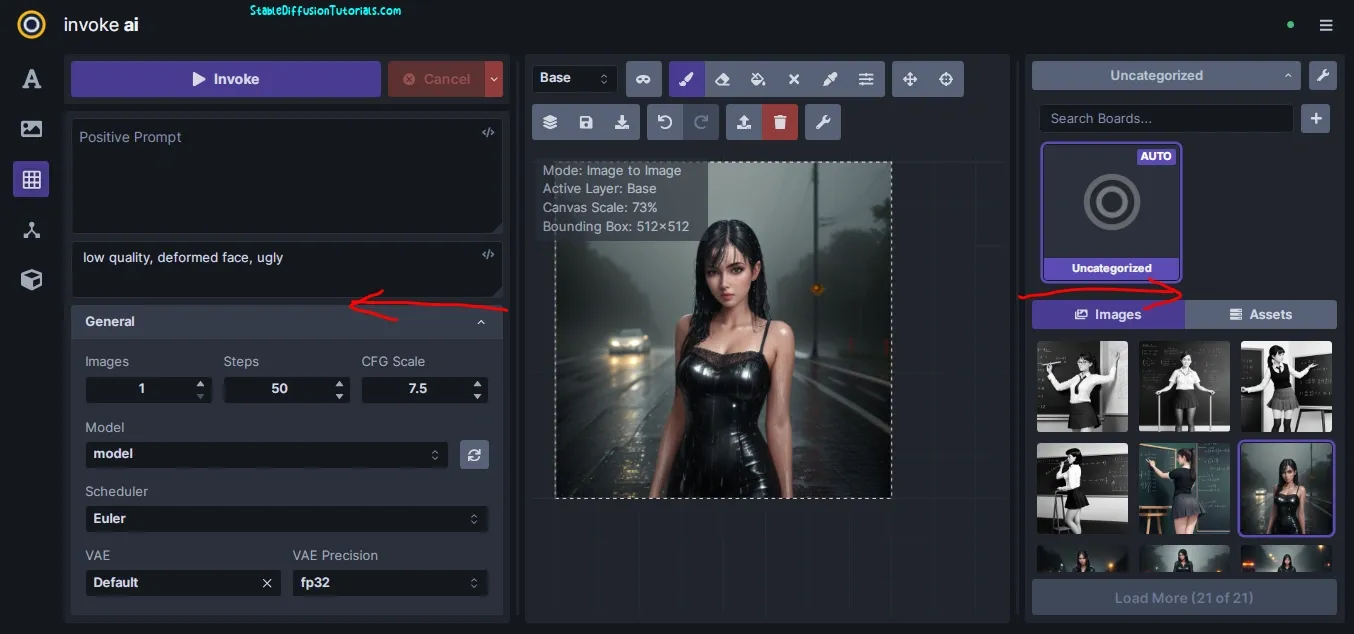
Here, if you want to hide the left and right panels and make a bigger canvas then it can be done by selecting and dragging to the left and right corner.
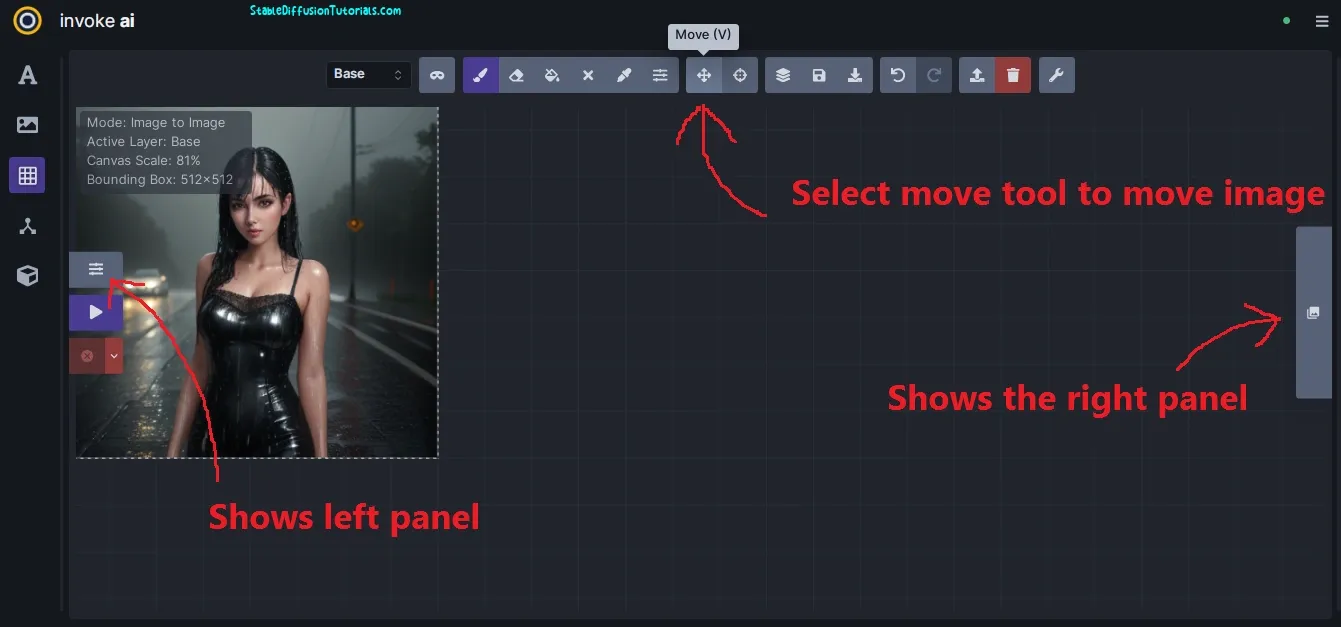
Again if you want to show the left and right panel then click on the menu-like button present on the left and right. The “Move” button can be selected for moving the image in the working area.
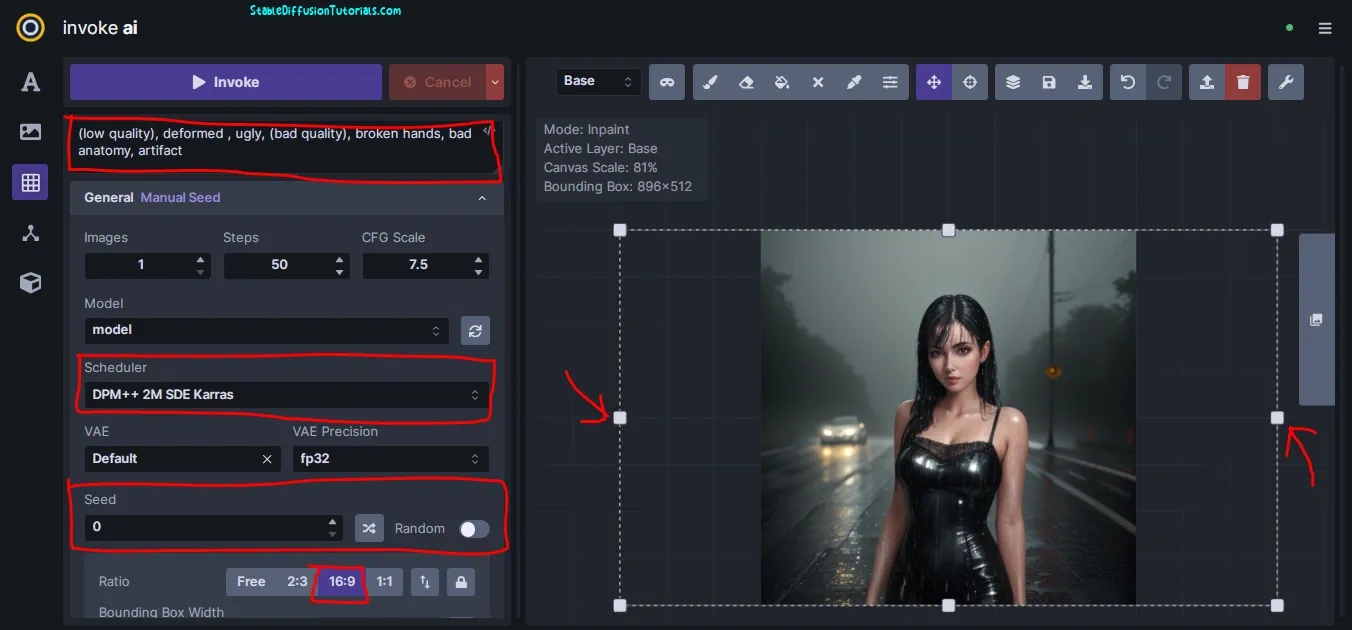
2. Now, if the image selected is in a 1:1 ratio like in our case and you want to convert it into wide and add some background effects from left and right in a 16:9 ratio.
So, select the options presented on the left panel. Add negative prompts so our background effects do not get distorted. Select your scheduler as your requirements. “Euler” or “DPM++ 2MSDE Karras” give more realistic outcomes.
Make sure to select the “Seed” value as “0“, otherwise your subject gets changed on the next generation. Then select the image ratio. In our case, it’s 16:9. Now expand with image border selection as your requirement.
Then hit “Invoke“, to generate output.
For refining the Outpainting results, you can also use the “Composition settings” available on the left panel. For batch generation change the numeral values.
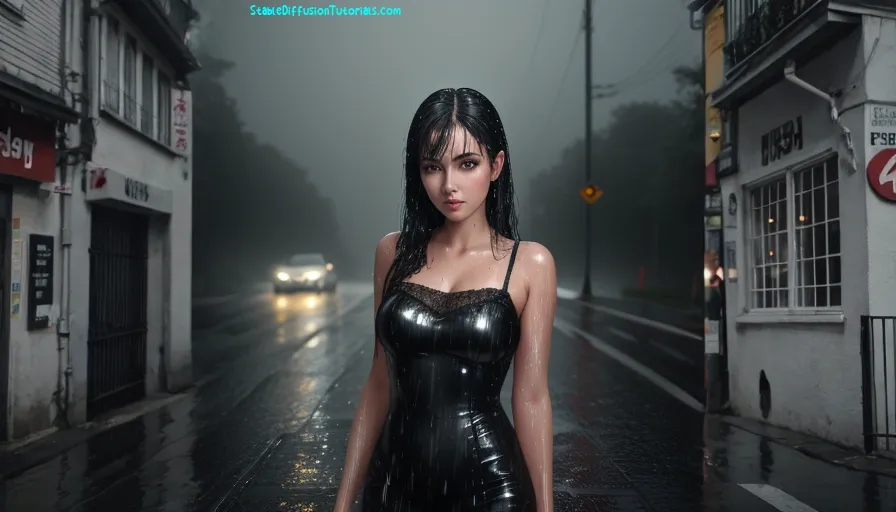
And here is our Outpainting results. Really it’s Perfect. But you can see a car coming from the background which does not give a realistic view, here we can add the object name as “car” into the negative prompt and regenerate the image.
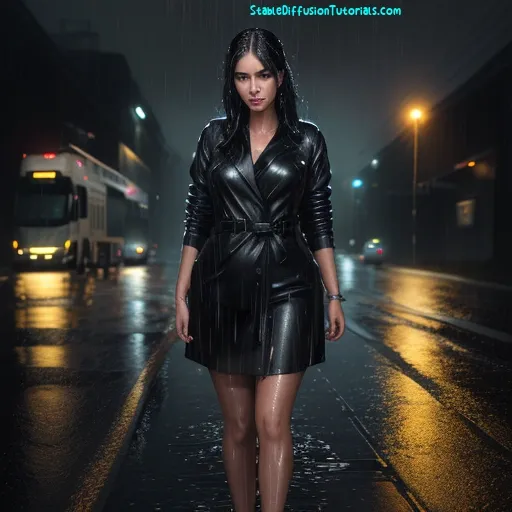
Again, we tried another example with a different effect, and here is the result.
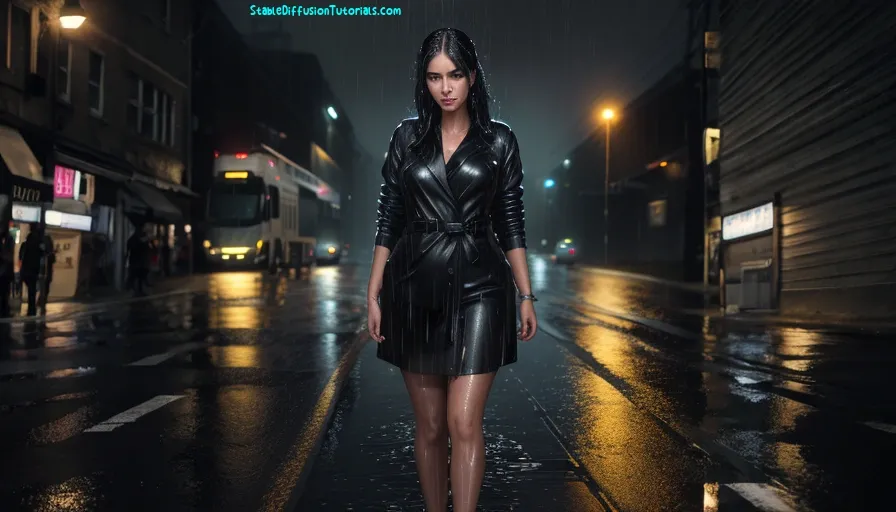
3. To save the image click on the Save button available at the bottom of the canvas so that it doesn’t get lost for future use.
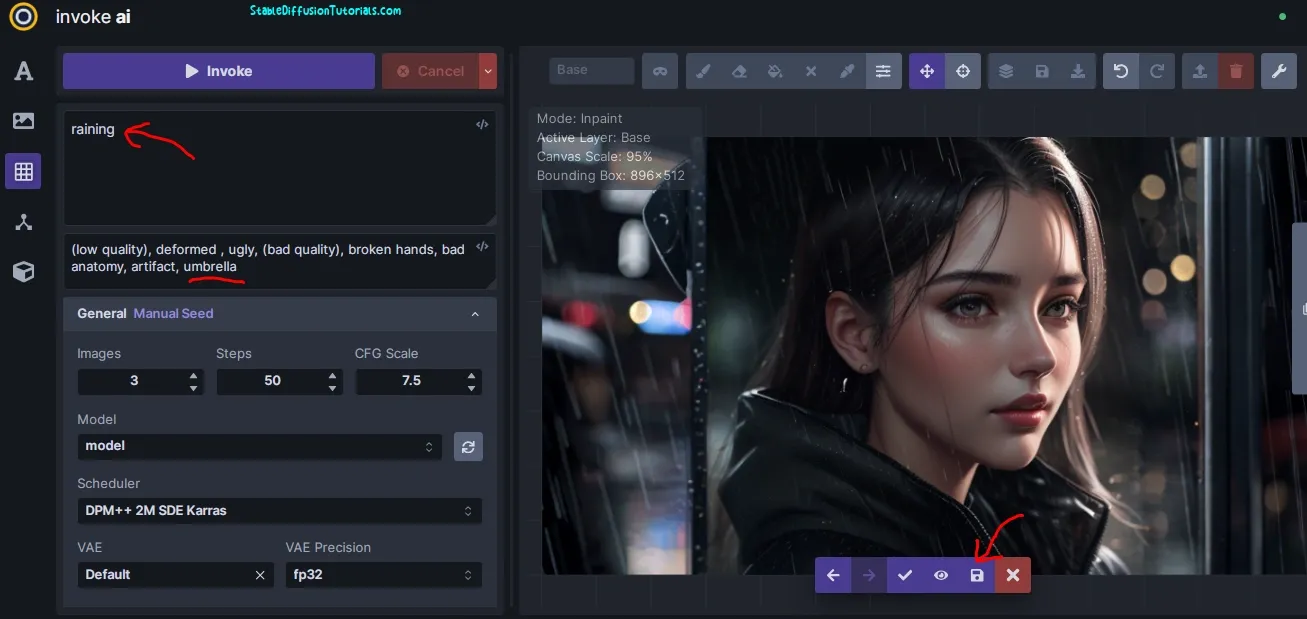
For another example you can see we have used “raining” in the positive prompt to add the effect to the image and for removing the “umbrella” we have added it into the negative prompts.
Steps to Inpainting:
In AI image generation, the inpainting method is used to change the part of the subject like hands, face, or object removals.
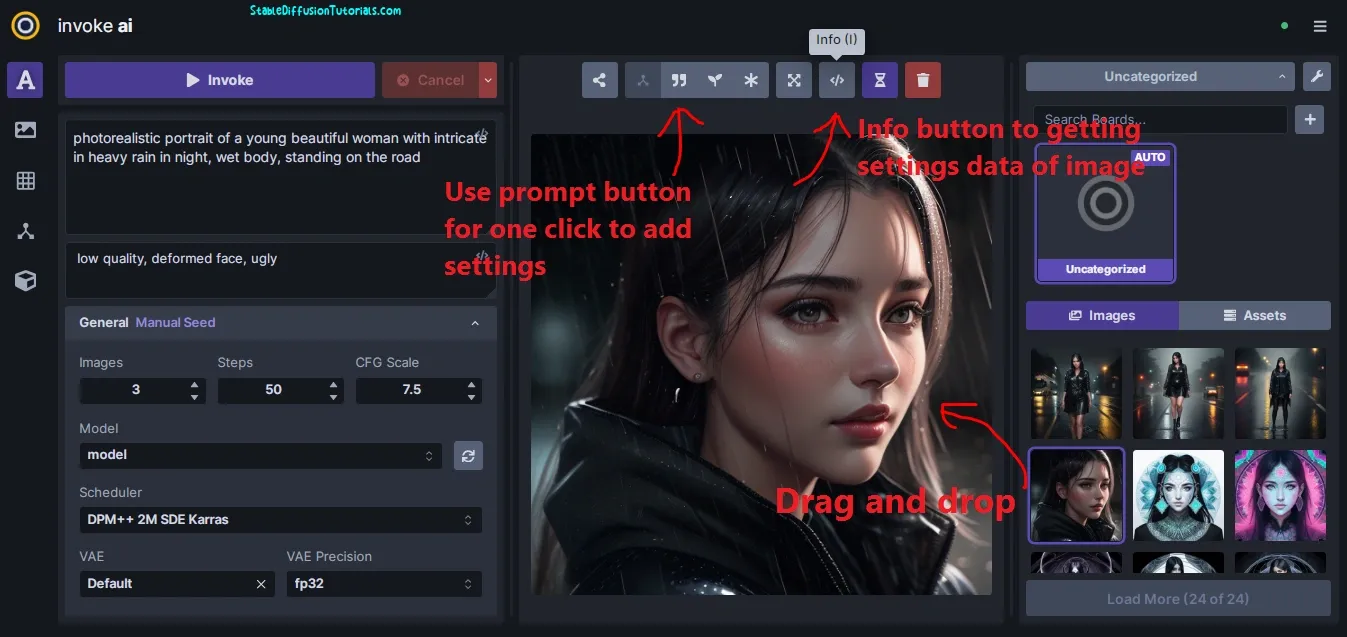
For inpainting, select the targeted image for the gallery, and drop it into the unified canvas.
You can add all the image parameters settings using the prompt button for images generated earlier. The info button is used to get the image data used as parameters for generating a particular image.
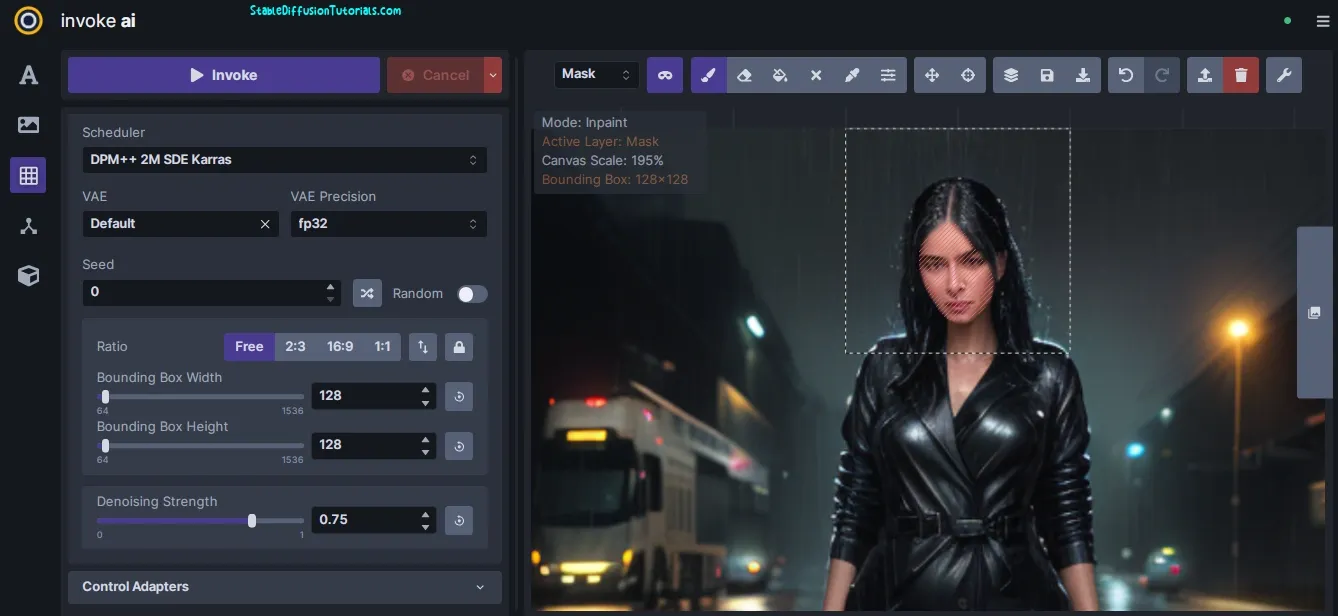
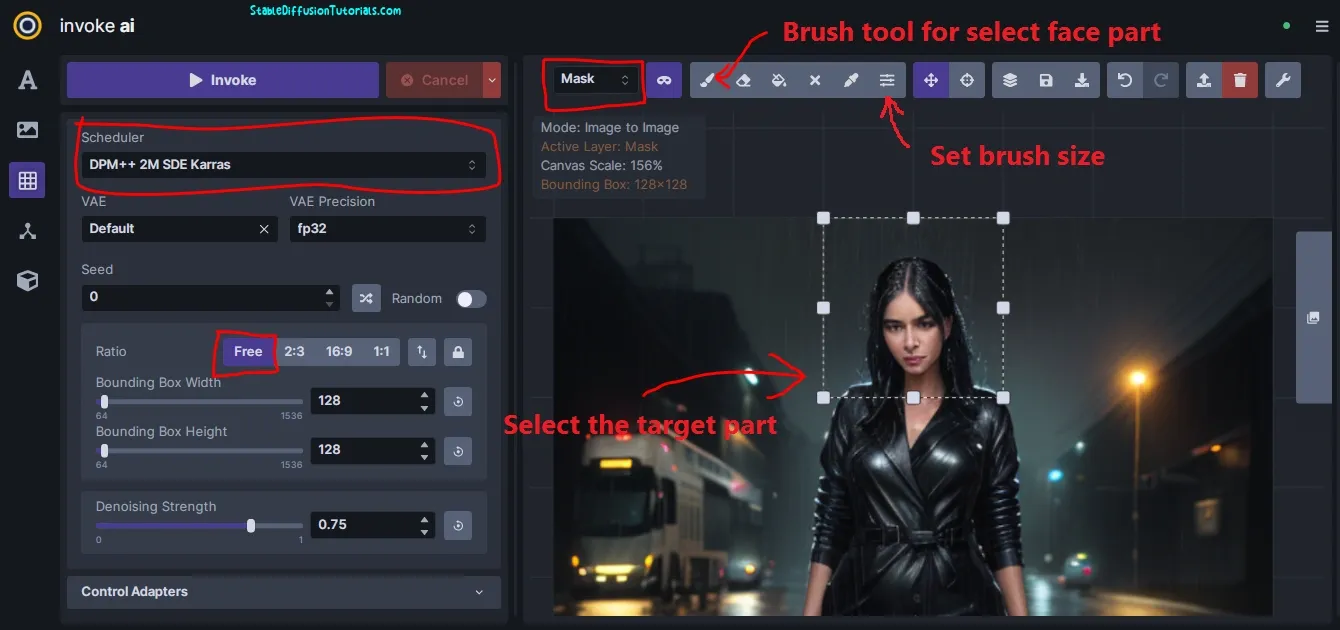
Set the square boundary area size to the image area. Here, we need to change the face of the subject. So, we have only covered the face area. You can increase and decrease the bounding area with “Bounding Box” options. Or “Free” option for working on any ratio. Set the scheduler to “Euler” or “DPM++ 2M“.
Select the targeted area using the brush tool on the top of the canvas. You can also select the brush size, which helps in better selecting the target. Select the layer option to “Mask” (default is “Base“).
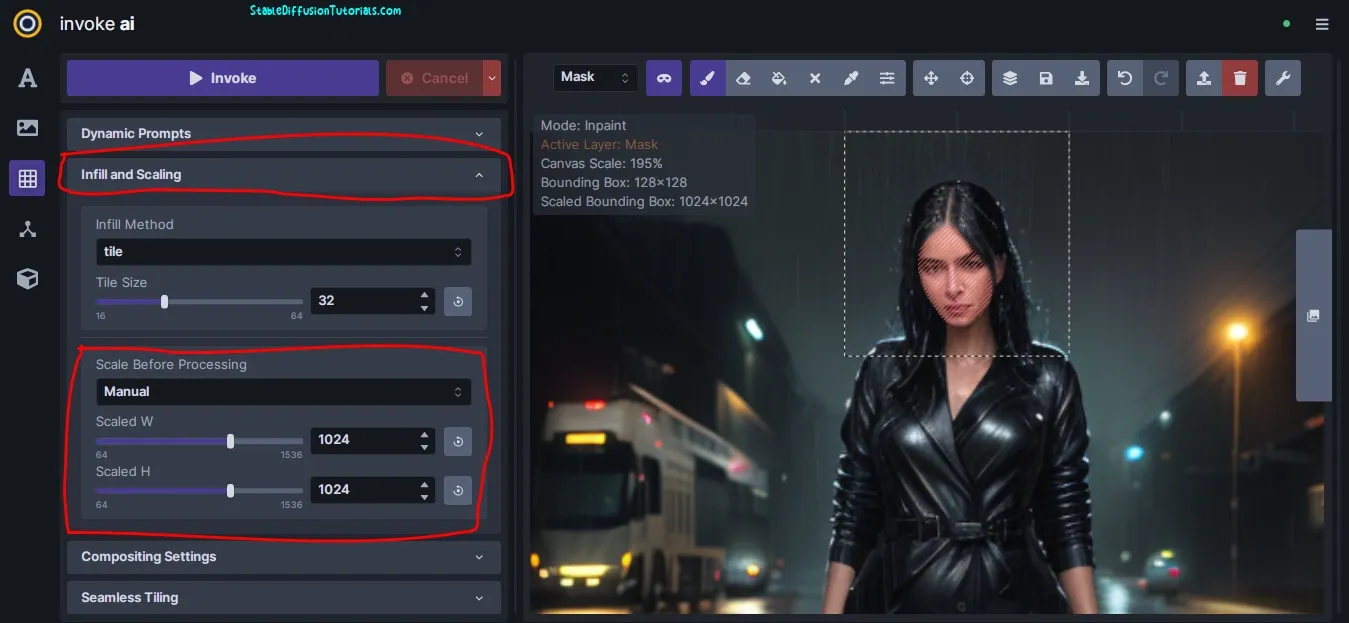
For higher resolution, you can select the “Infill Scaling” feature, Select any resolution, and go for “Manual” settings. We have set it to 1024 by 1024 pixels. This generates the selected area and then downscale it so that you get a more refined output.
Now, hit “Invoke” to generate the required image.
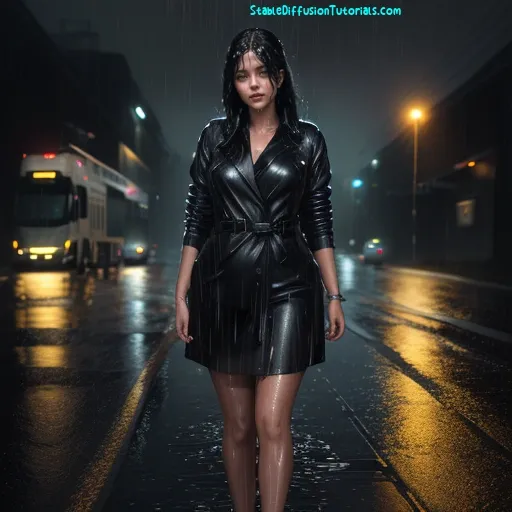
You can see the output has been enhanced very much from the previous outcome. The face is more beautiful and realistic with detailing. The hair coming over the face adds more realism to the image in the raining effect.
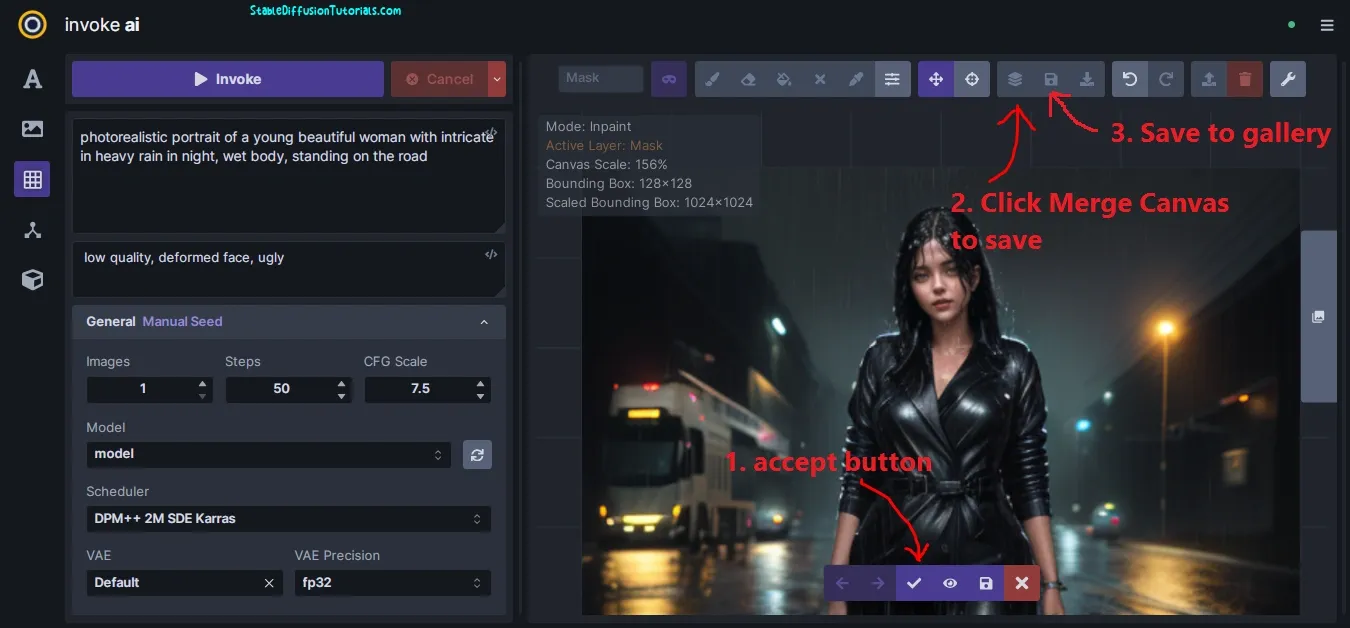
Now, Select the accept button to reflect the changes. Then click the “Merge Canvas” button, and again select the “Save” button to save to your gallery.
Steps to Upscaling:
If you want to upscale your image in any resolution, then load your image into the unified canvas select the “Upscale” button, and hit “Invoke“.
Conclusion:
Invoke AI is a powerful Webui not so popular but works as a good alternative to Automatic1111 and Fooocus. The user interface is very interactive and easy to use. Not many complicated options like in other Stable Diffusion WebUIs.

