There are many confusions in installing and running
stable diffusion on Google Colab. Well, after doing lots of research
on the internet we came to know that the team of Colaboratory has restricted the usage of Stable Diffusion WebUI on a Free plan.


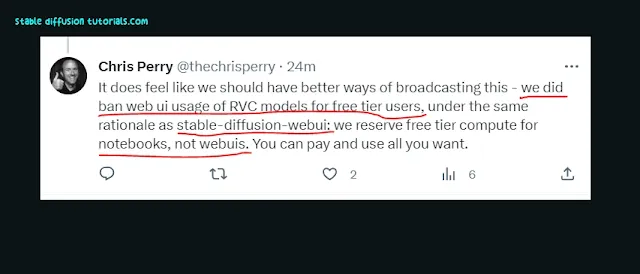
It simply means that Google Colab didn’t ban the usage of
Stable Diffusion but they are just restricting the heavy usage of Web-UI that utilize the Colab environment to bypass it and run external WebUI.
So, we thought why not make things simple and use
simple code by leveraging the power of Tesla T4 GPUs which are provided as a
free tier in Google Colab.
Don’t panic about getting those weird codes because we have
written all the Python codes to run stable diffusion and we are going to
explain everything in a simplified way even if you are a non-technical geek.
Steps to Install Stable
Diffusion on Google Colab:
Installation:
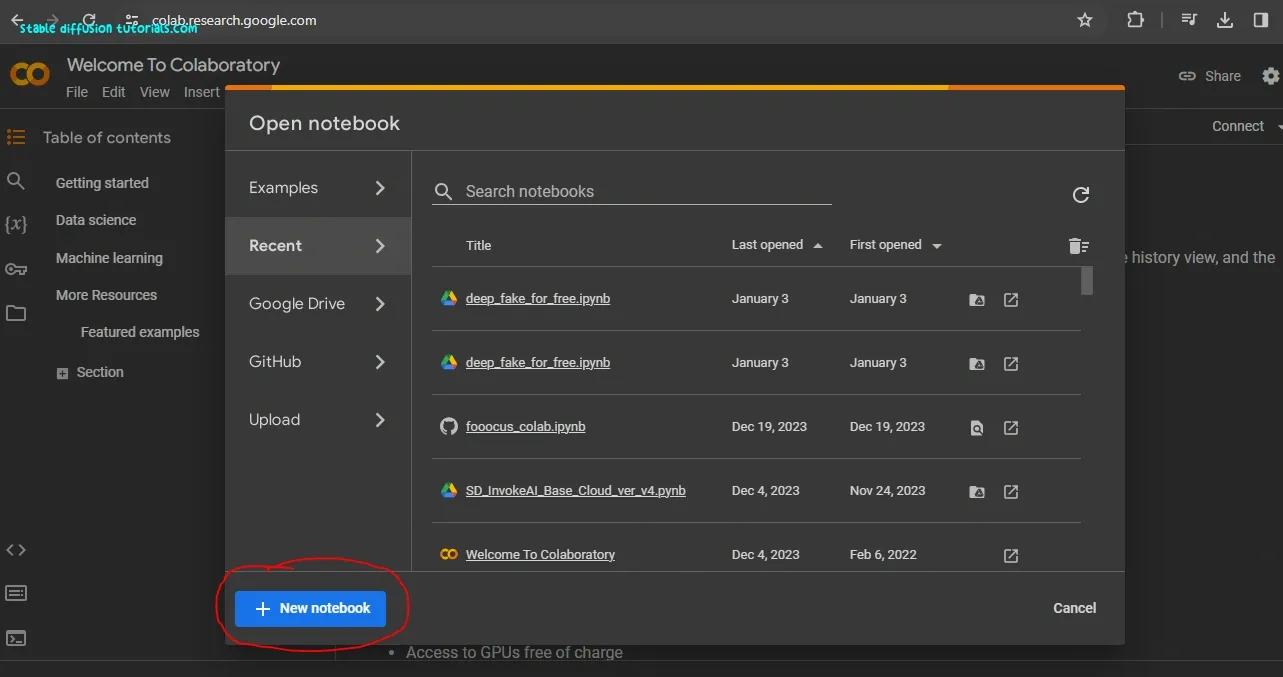
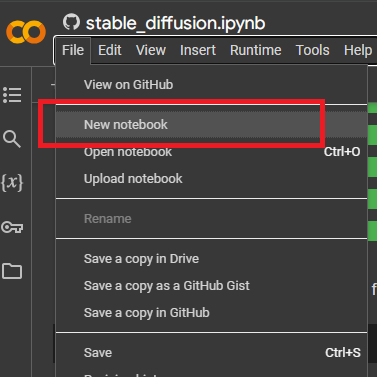
0. First open your Google Colab , on the top Menu. click on File and select New Notebook.
Well, if you are new to Google Colab then it’s not a problem, you just need to take care simple functionalities that are provided and help to execute these
codes.

So, the boxes you are seeing are called cells where we write our Python
code to execute a specific block of code. After writing a code into it we can execute
individual cells using the play button provided on the left side of every cell.
Here, in Python pip
(which means Python Installation Package) is a basic command used to install any
library (supportive prerequisites) to run any functionalities.
Well, Google Colab has all the basic libraries that can be used to do highly sophisticated programming like training models, image processing, and machine learning. However, the Python community is huge, so we need to install some extra libraries and prerequisites for running Stable Diffusion.
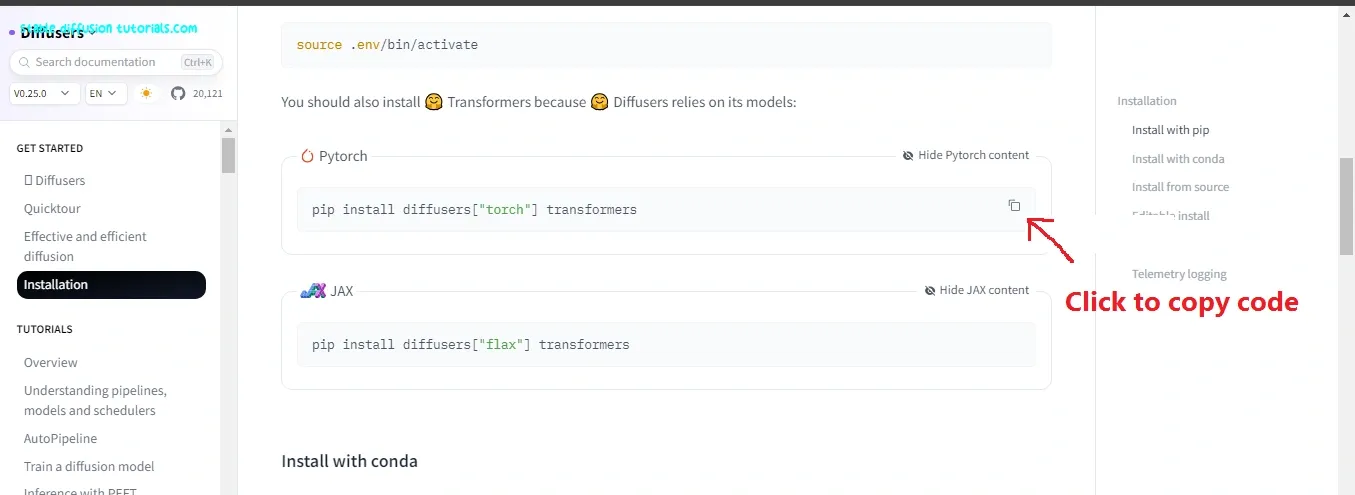
1. First, go to the Hugging face’s Diffusers official page and Click the “Installation” option available on the left side of the page.
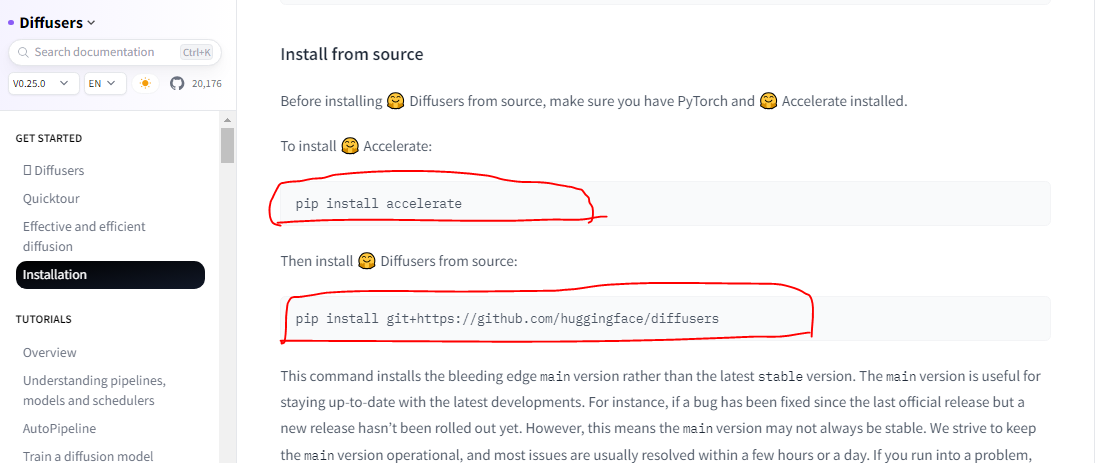
Here, we are using “!” (exclamation) before every pip command (Ex !pip) to run on Colab and see the installation status on the cell itself.
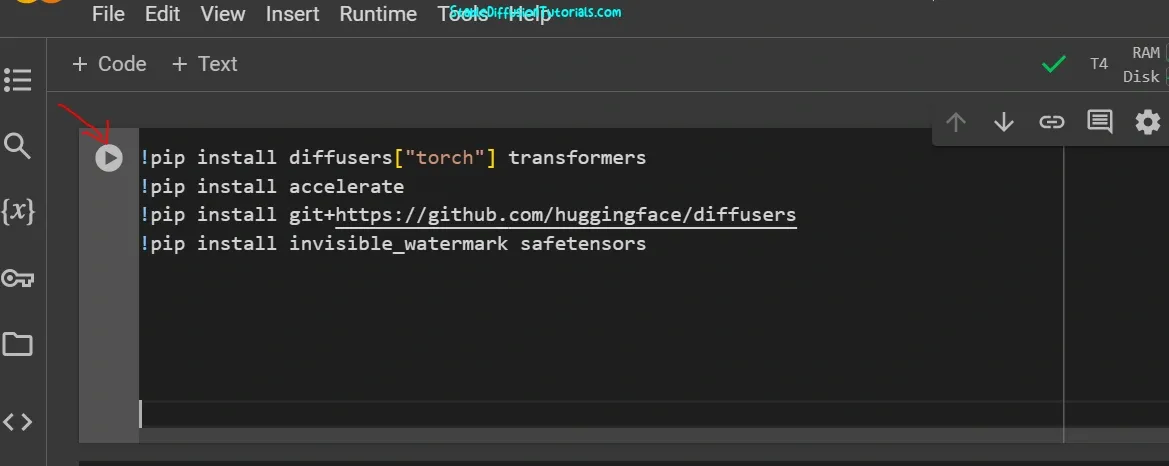
!pip install diffusers[“torch”] transformers
!pip install accelerate
!pip install git+https://github.com/huggingface/diffusers
Now, just copy and paste the given code provided into your created New Notebook on Google Colab for downloading and installing the Diffusers library, accelerator library, and hugging face repository.
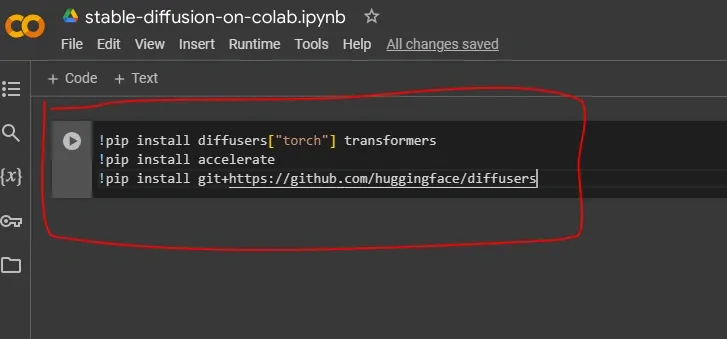
After pasting all the codes in the cell of Google Colab, it will be like this as we have shown in the above image.
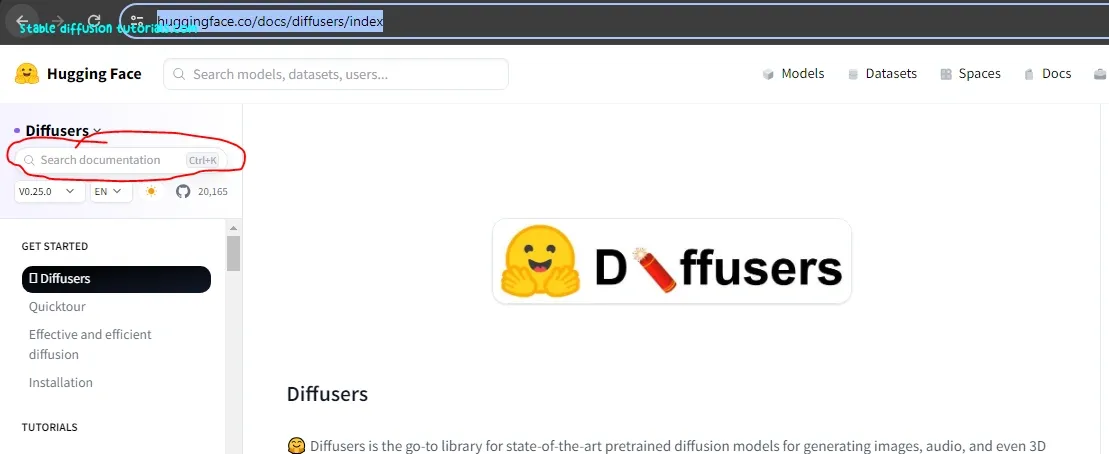
2. Navigate to the top left corner and find the search bar.
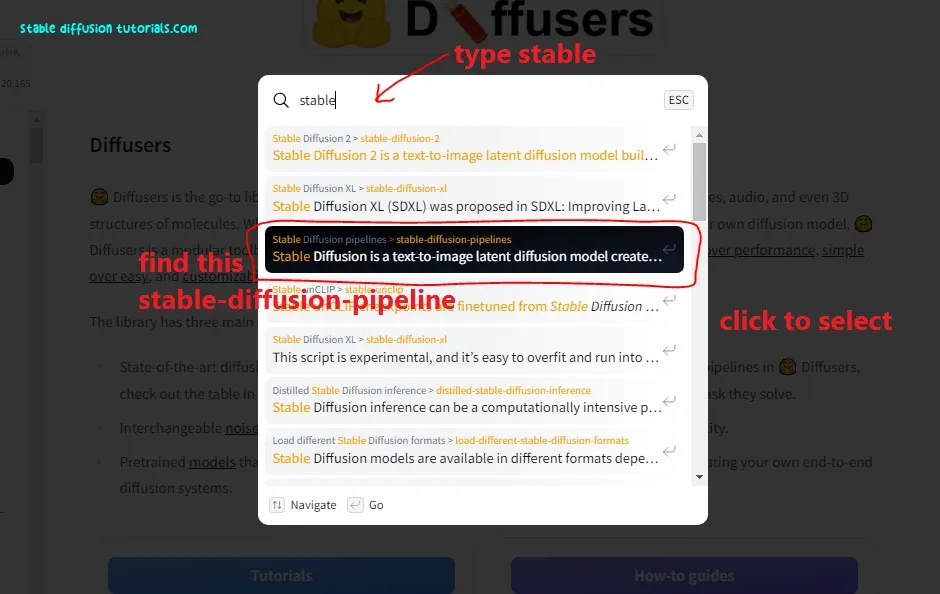
Click on it and type “stable“, you will see “stable-diffusion-pipeline“. Just click on it.
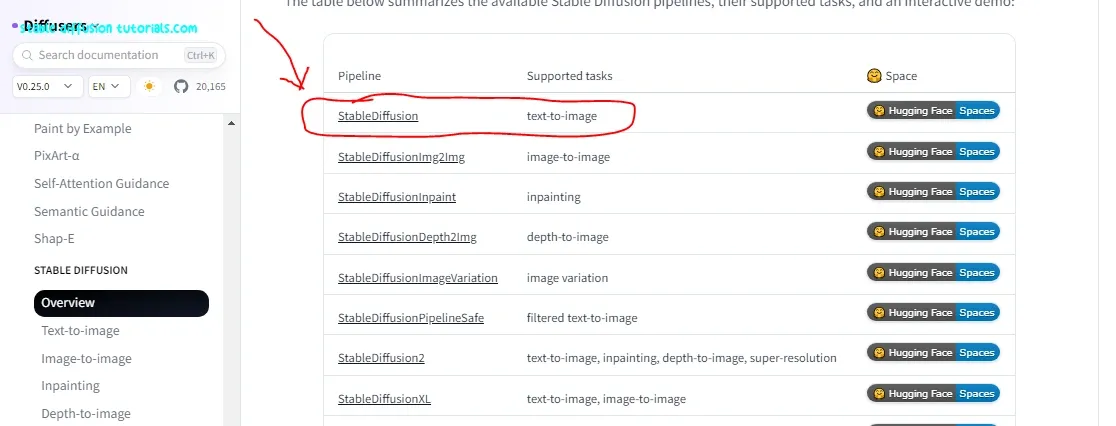
3. Now you will be redirected to a new page. Move to the down and search for the “StableDiffusion” link which supports text-to-image tasks and just select that option.
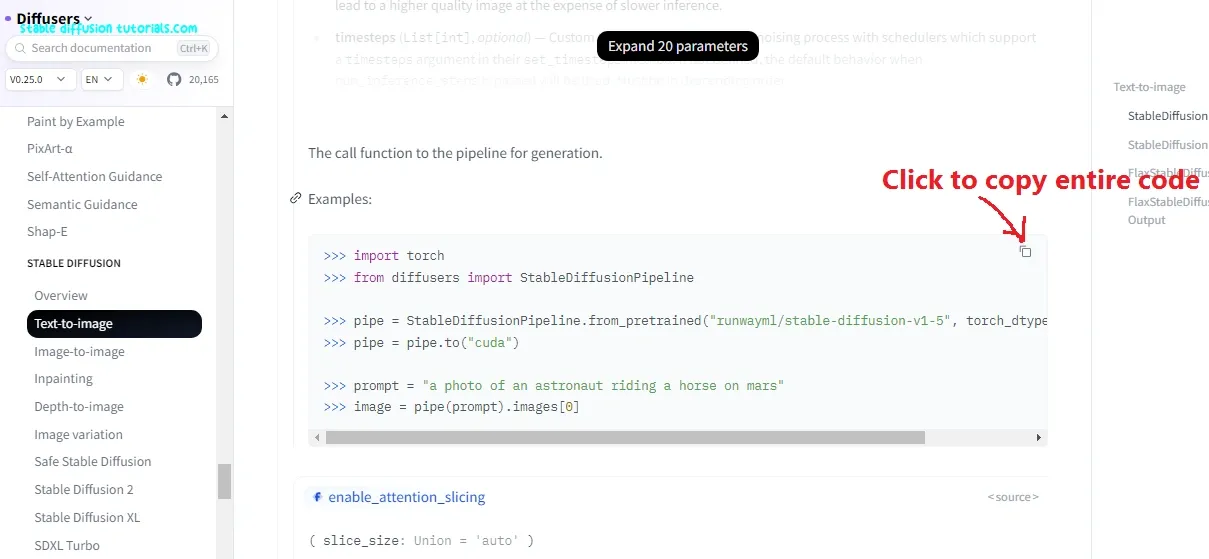
4. Again, scroll down a little bit and search for a block of code for diffusers, you need to copy and paste it into your Google Colab’s new cell link you are seeing on the above-illustrated image.
Or you can directly move into that section by going to the respective link provided below:
https://huggingface.co/docs/diffusers/v0.26.3/en/api/pipelines/stable_diffusion/text2img#diffusers.StableDiffusionPipeline.__call__.example
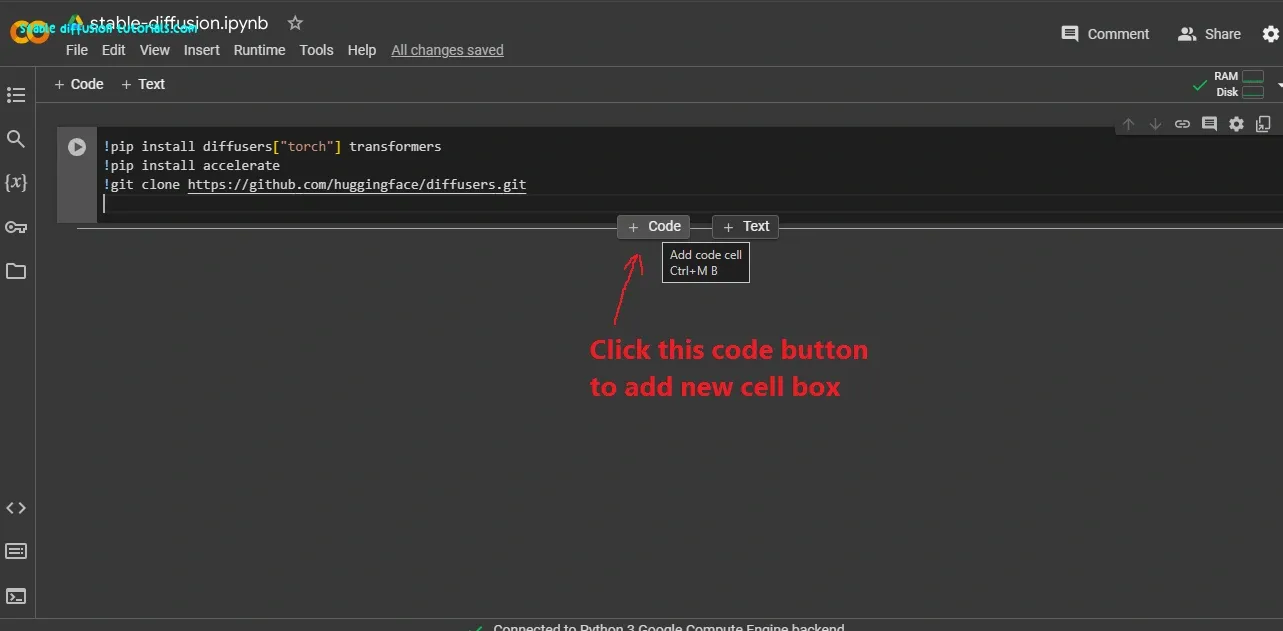
5. Create a new cell by moving your cursor on the border of the cell, click on the “Code” button and paste the copied code into the new cell.
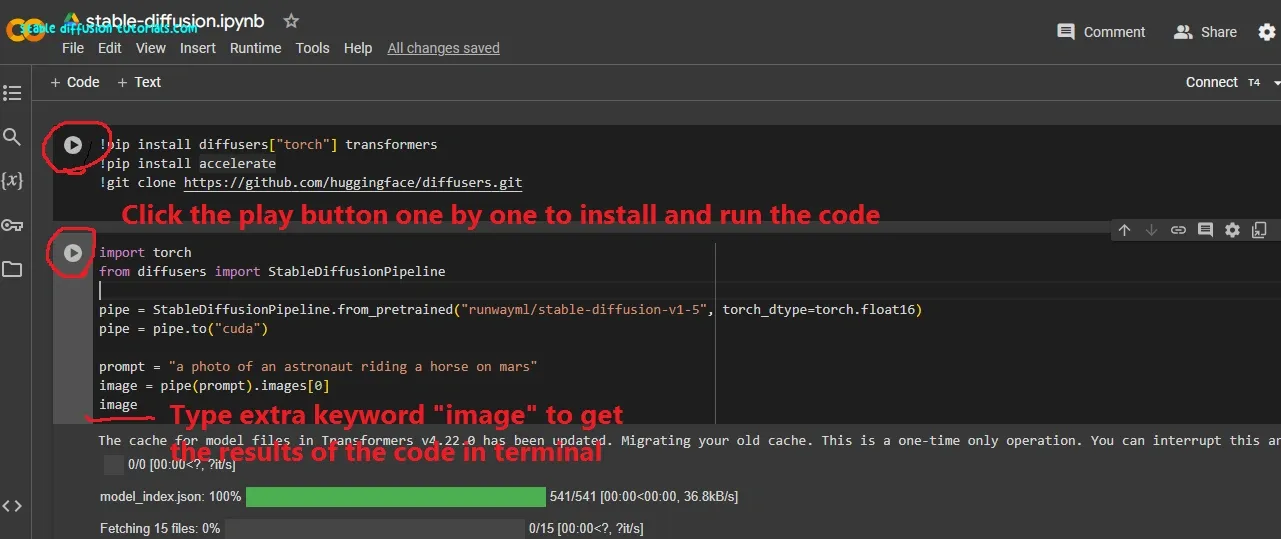
6. After that add an extra keyword with the code and type “image” (called a Python variable). This will help to see the results we get from executing the copied code in real-time.
While copying and pasting the python code, do not add extra space by your own between the codes other wise you get an indentation error.
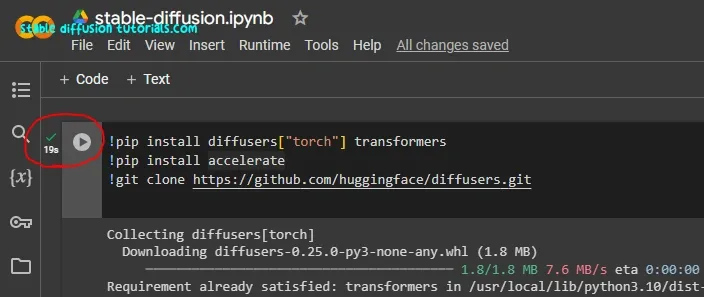
Finally, we have to run the block of code one by one by clicking the play button. Wait for a moment after clicking the first cell until you see the green check mark available beside the play button.
This means that the installation has been completed. You can click one by one on the play button to execute the code available on every specific cell.
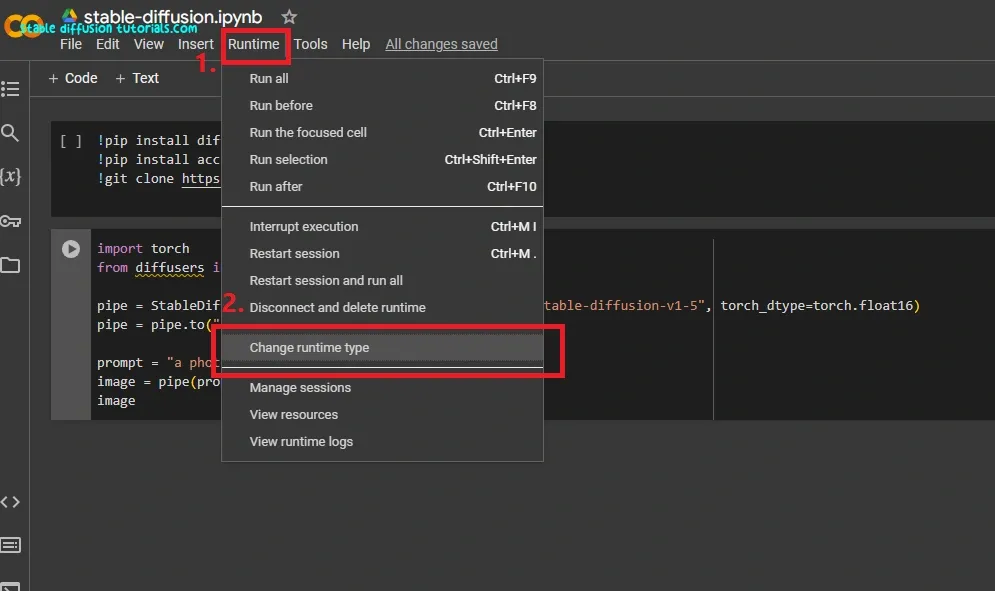
7. Now, comes the settings part that will be very simple.
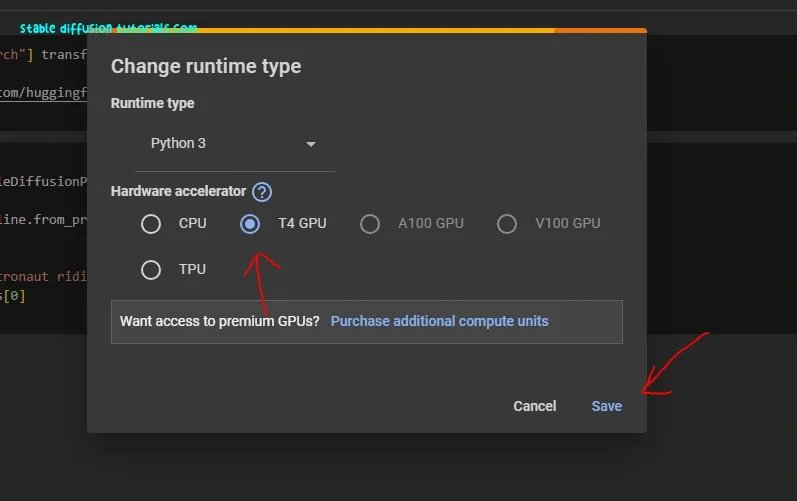
Move to the menu and select the runtime tab, then Change runtime type. And again select T4 GPU and click Save. In a few seconds, Colab connects to GPU and you will see a green check sign with T4 written over the top right corner.
W
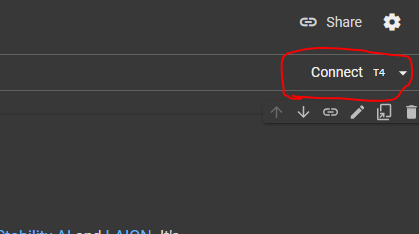
e will have to start the GPU provided by Colab. For that, you will see a connect button on the top right corner of the dashboard. Click to Connect.
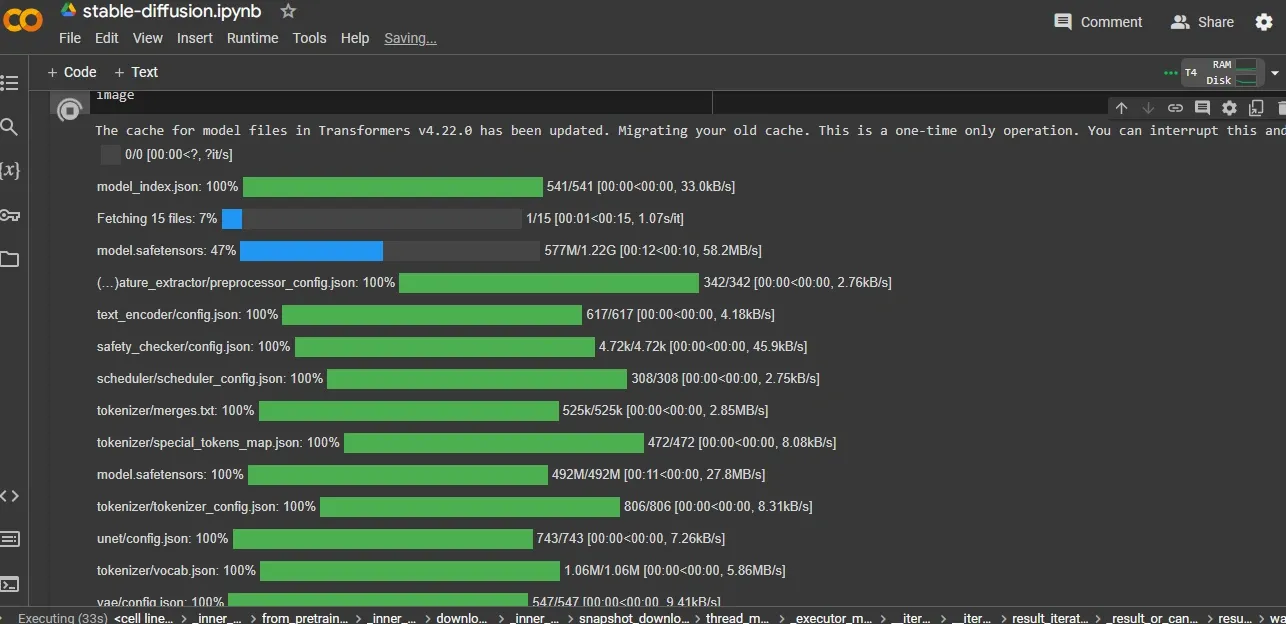
It takes some time at the start because it installs some files and packages necessary to run it. The files and models are around 3GB. And at last, you will see an image that will generate in just a few seconds.
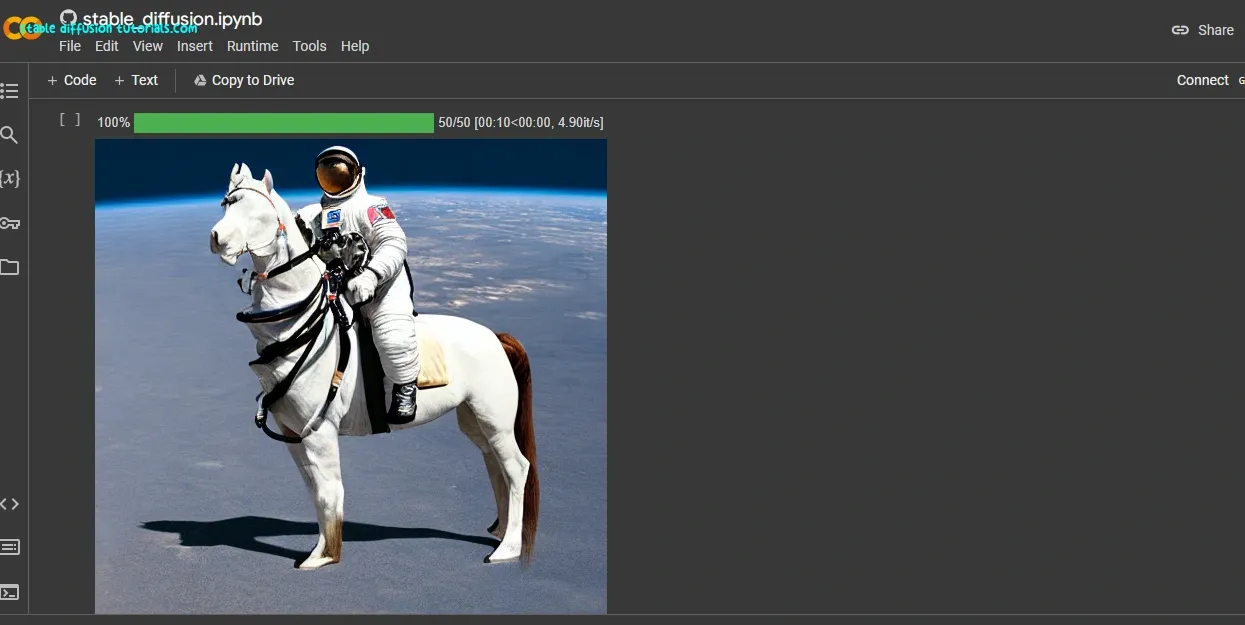
Voila, we got the result as the generated image of an astronaut riding a horse which we have prompted into the code.
For generating quite good Stable Diffusion Prompts, you can use our Stable Diffusion Prompt Generator which will help you to generate tones of AI image prompts instantly.
Saving the output:
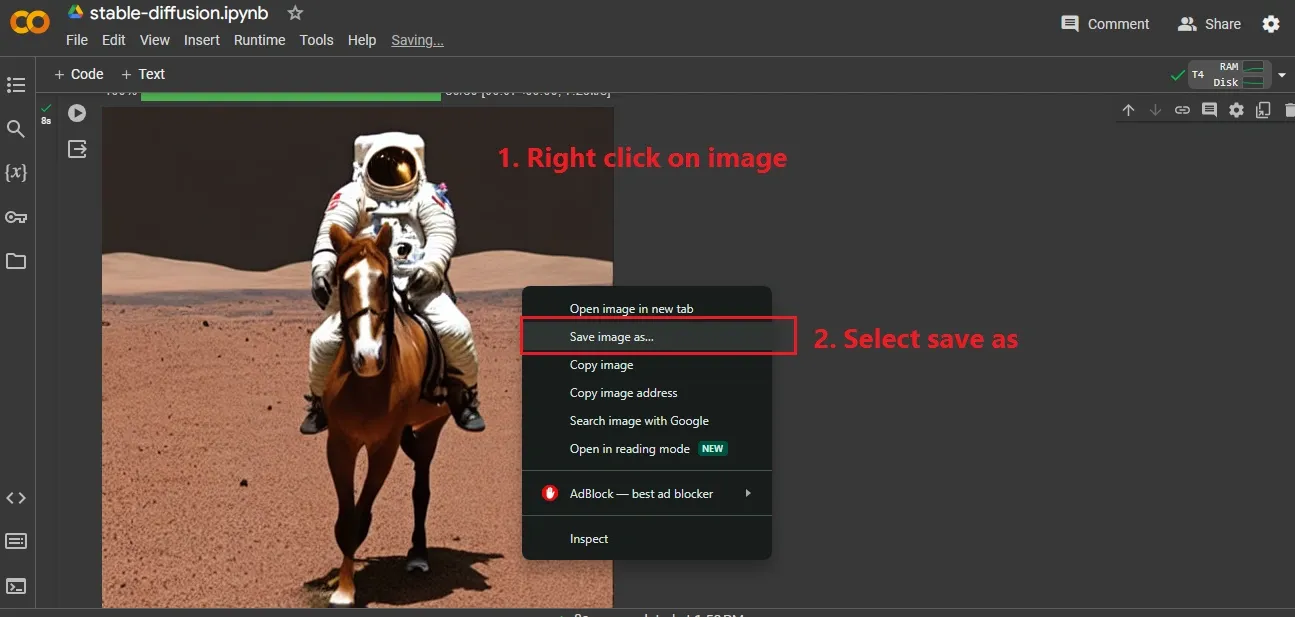
To save the generated image, you need to right-click on the image and select on the “Save image as…” option.
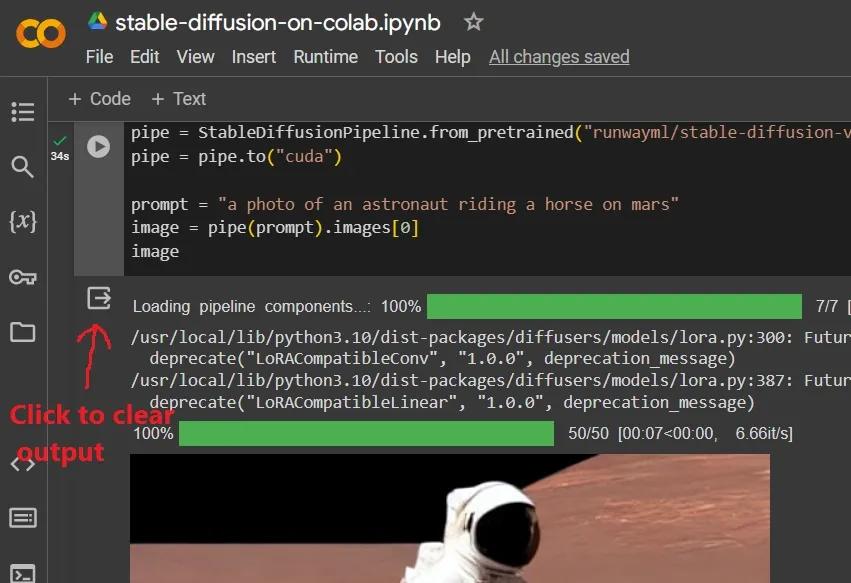
Now, it’s not looking clean. So, if you want to clear the earlier output then click on the arrow button.
Setting Prompt box:
Now, you must be wondering, where to put the prompt and generate multiple images. So for this, we have to make some minor changes that will be very simple. Using this method, you don’t need to load the model again and again. Just follow our steps.
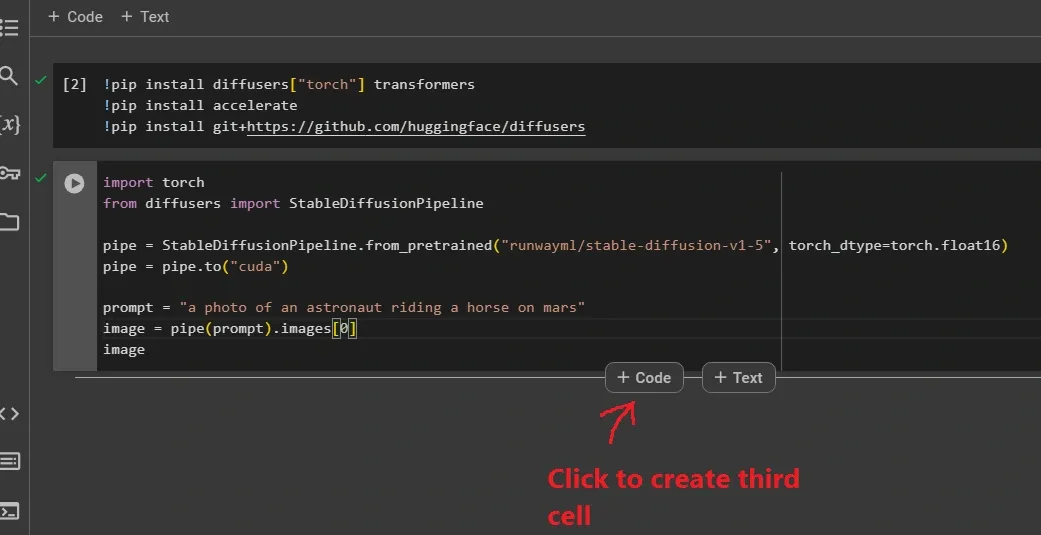
Create a third cell by clicking on the code button, following the steps provided example on the above image.
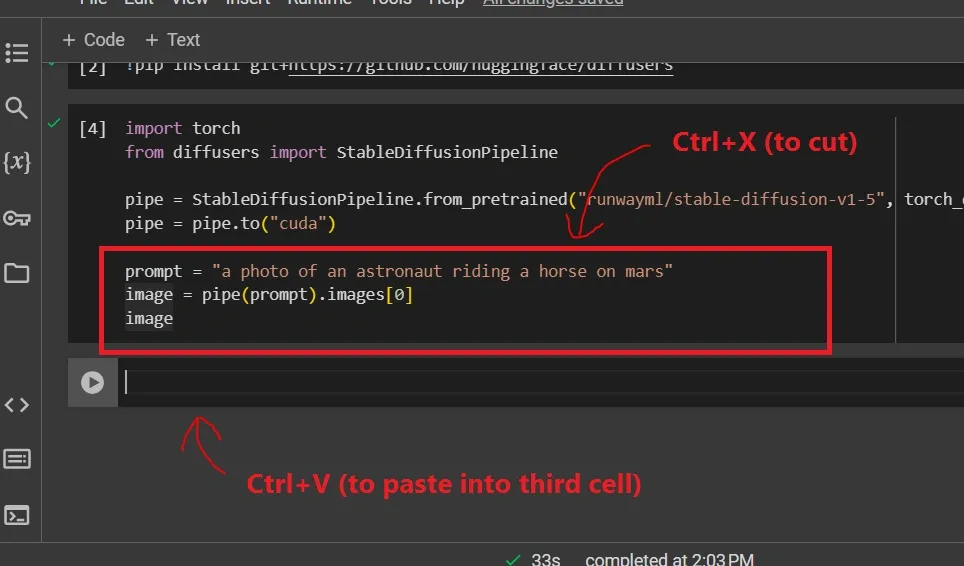
Now, move your cursor, select the three lines of code from the second cell, and use Ctrl+X to cut and Ctrl+V to paste the code into the new third cell.
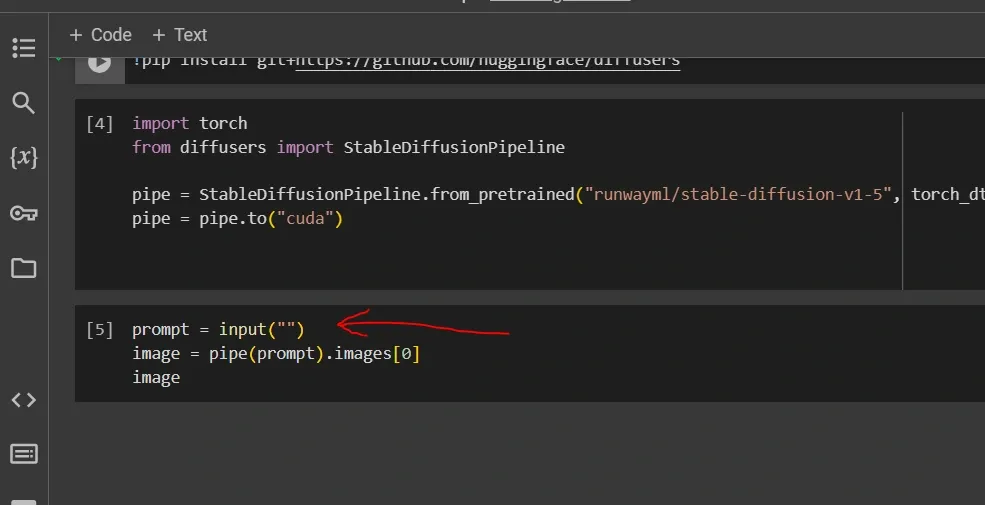
Now we need to do some code modifications. On the third cell, after the keyword “prompt =“, remove the text (prompts) and add input(“”) python function command like we have shown above on the image.
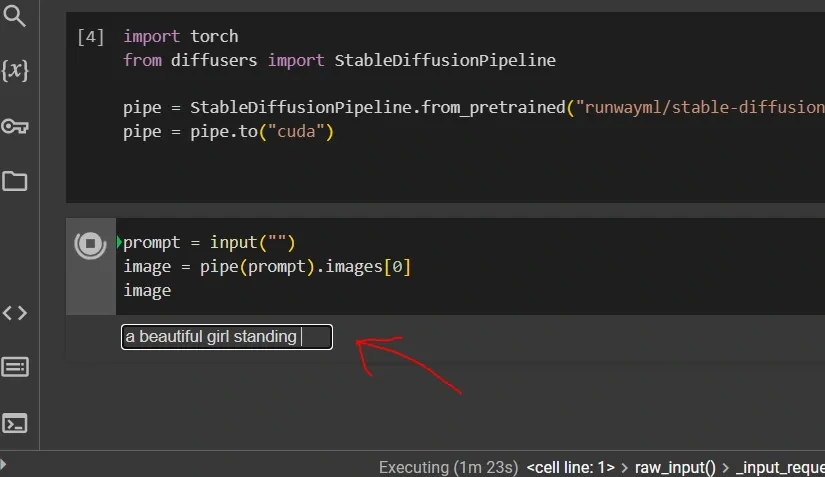
This command will help you to generate different images by asking for prompts whenever you click on the play button of the third cell. Now an input prompt box will appear. Put your prompts and press enter to generate any relevant image.
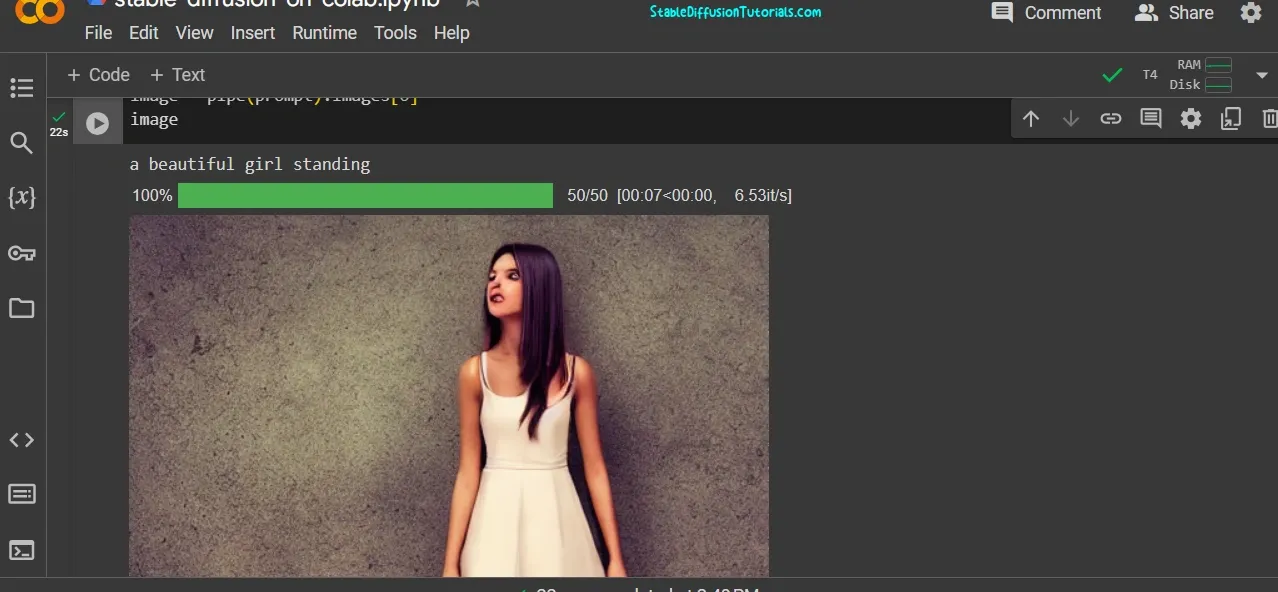
Checking the stats:
You can see the output is so ugly, deformed, and weird. To solve this, we need to set up the CFG scale, Guidance, Sampling steps, etc. Again this can be done with the code modification. But, before that, its to take important point in mind is to keep an eye on VRAM, CPU, and RAM usage.
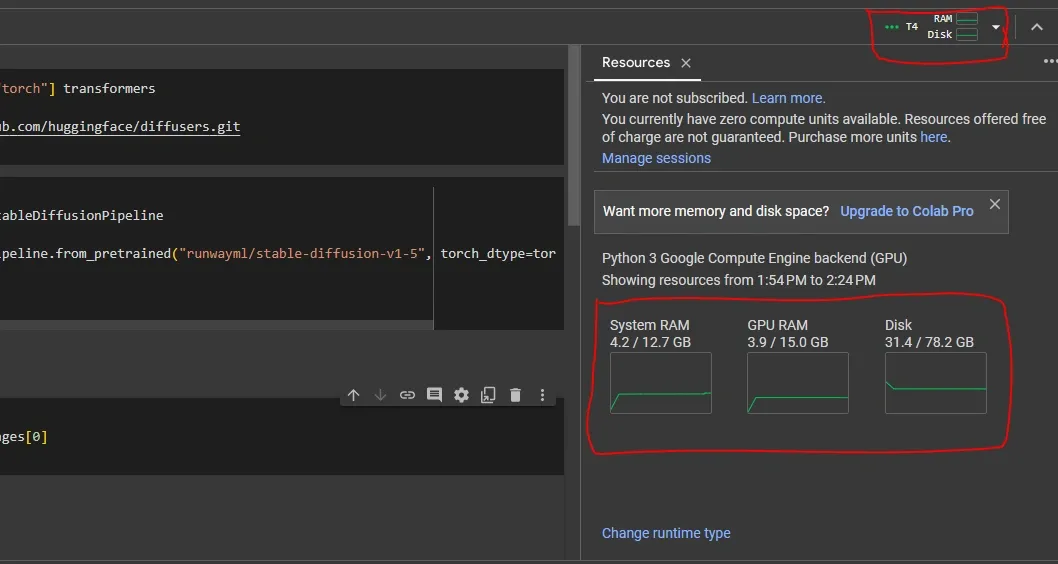
To check the status of GPU and RAM status, click on the corner “T4” button. You can see we have installed the required model and run Stable Diffusion on Google Colab for more than 30 minutes, but the VRAM and RAM didn’t cross even 50% of the total resource.
This is what you need to take care is when you use WebUIs like Automatic1111, InvokeAI or FOOOCUS which are built on Gradio library they consumes much GPU and RAM resources which results in multiple disconnects and sometimes even Google Account termination. But, in this workflow without using any WebUI you can run Stable Diffusion seamlessly for free without disconnects.
Setting Parameters:
Let’s try something else like generating human images:
We tried the prompt to generate a beautiful girl having long red hair. This is the output using the base model Stable Diffusion 1.5.

You can see the image is so ugly and weird, the hair color is so glowing and unmanaged, the clothing is not perfect, and the eyes and lips are so blurry. This is actually happened because we are only using the base model 1.5 without any detailed positive, or negative prompts, CFG, Guidance Scale, Sampling steps, etc. So, to get the perfect output it’s recommended to use the specific pre-trained model for the specific object.
Now, for setting up the parameters we need to do some modifications which we have mentioned below. Just remove the previous code from the third cell and copy and paste the code that we have given below:
############COPY and PASTE the BELOW CODE (one by one) ####################
This is for creating prompt box:
prompt = input(“”)
Set your image height from here:
height= 512
Set the models weight of your image:
weight= 512
The sampling steps:
steps=25
Set CFG Scale
guidance=7.5
Add your negative prompts between the inverted comma:
neg=””
This is just the pipeline python function used to pass all the parameters to generate an image.
image = pipe(prompt, height=height, weight=weight, num_inference_steps=steps, guidance_scale=guidance, negative_prompt=neg).images[0]
This is python variable to show the output in terminal (you can use any other name but not predefined python commands):
image

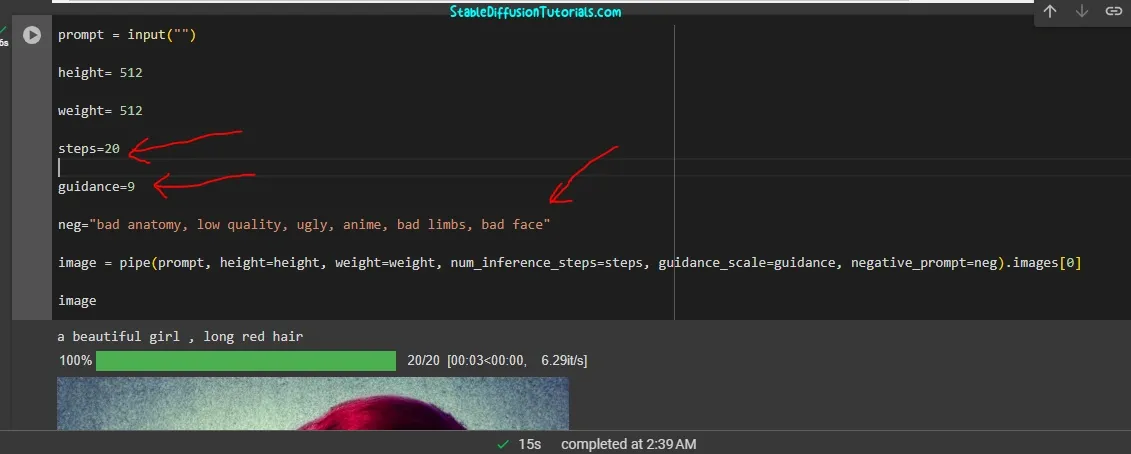

Its to inform you that different Stable Diffusion models behave different with their parameters, so you should feed its relevant parameters wisely while choosing it. For relevant parameters you must check their description section.
Downloading and using trained/fine tuned models:
There are tons of pre-trained models releasing by the community over the internet that can be found on the Hugging Face and CivitAI.
For illustration, we have shown using the Hugging Face platform.
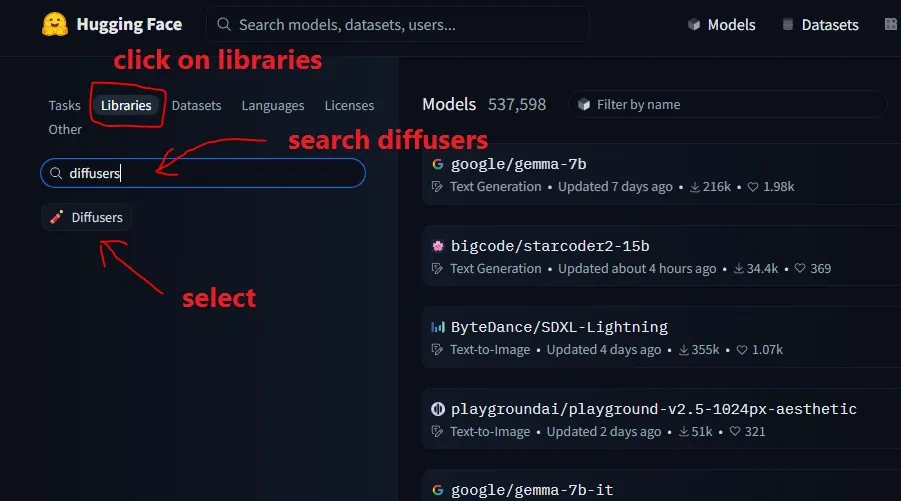
1. First go to the hugging Face platform, click on Libraries tab and search for “Diffusers” and select it.
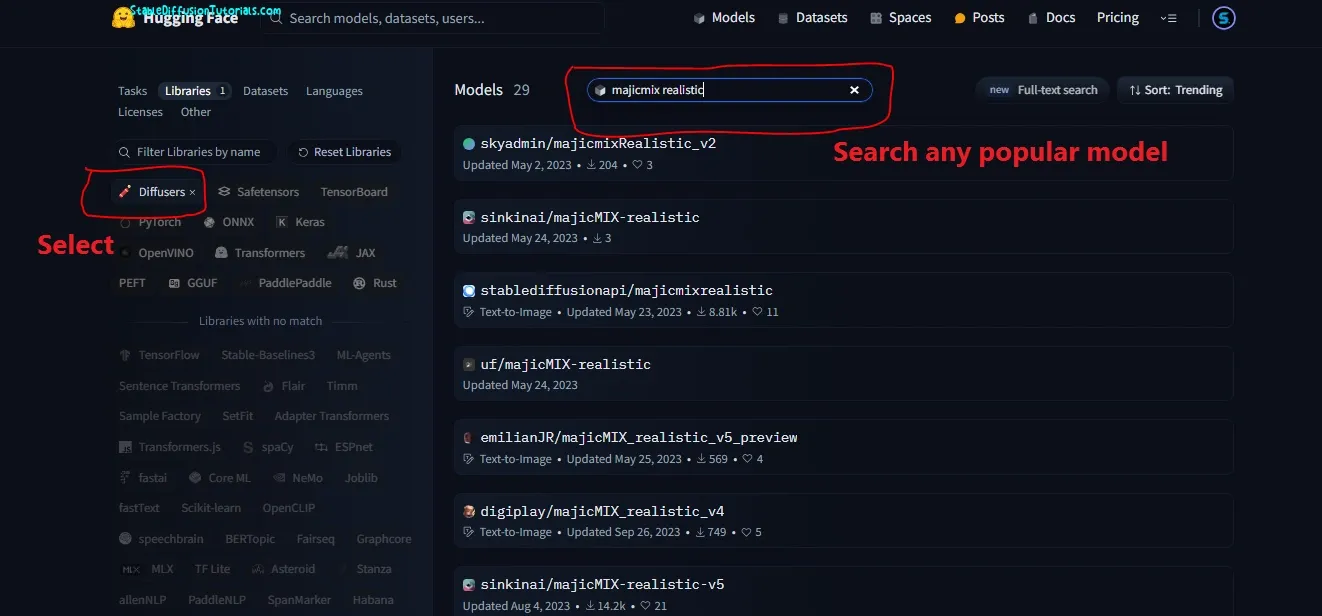
For example, we have found one model from Hugging Face named “majicMix_realistic_v6” by searching on the search bar of the platform. Here, this model has been trained with SD1.5 base model, so you will only use the code from Stable Diffusion1.5.
Make sure you first select the “Diffusers” tab presented on the left side then search for any specific model.
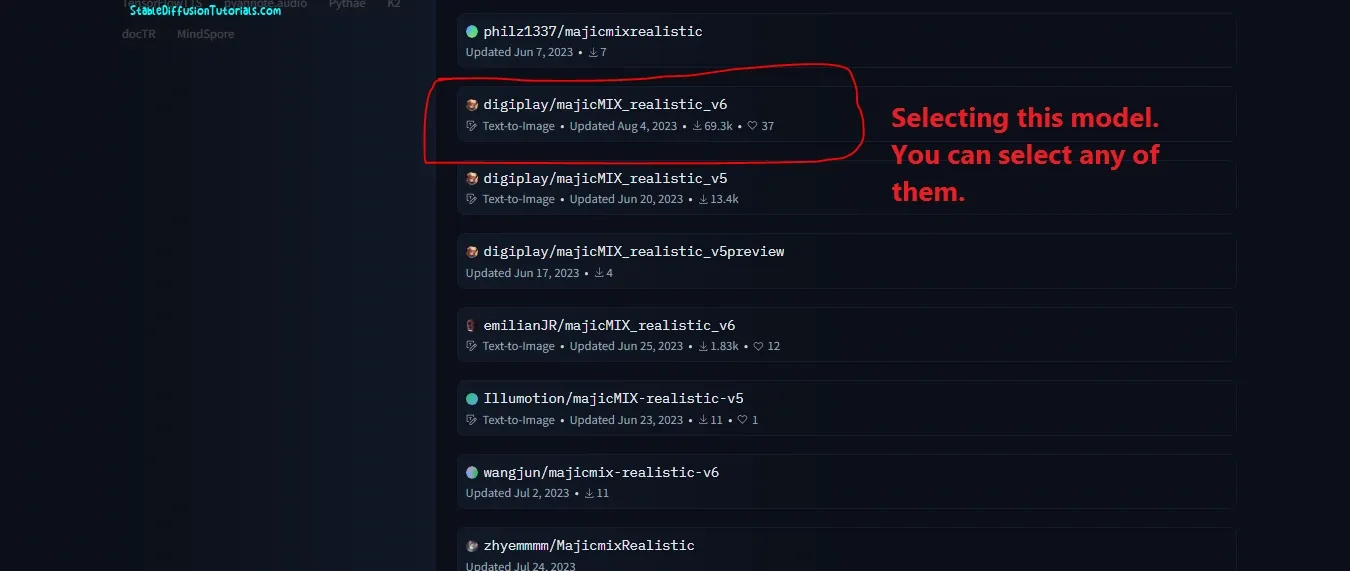
2. Select any popular model that has maximum downloads, many likes, and star ratings gives you the perfect results because we observed many wrong models are also getting pushed into the platform which will only make your store full with time wastage. So choose your particular model wisely.
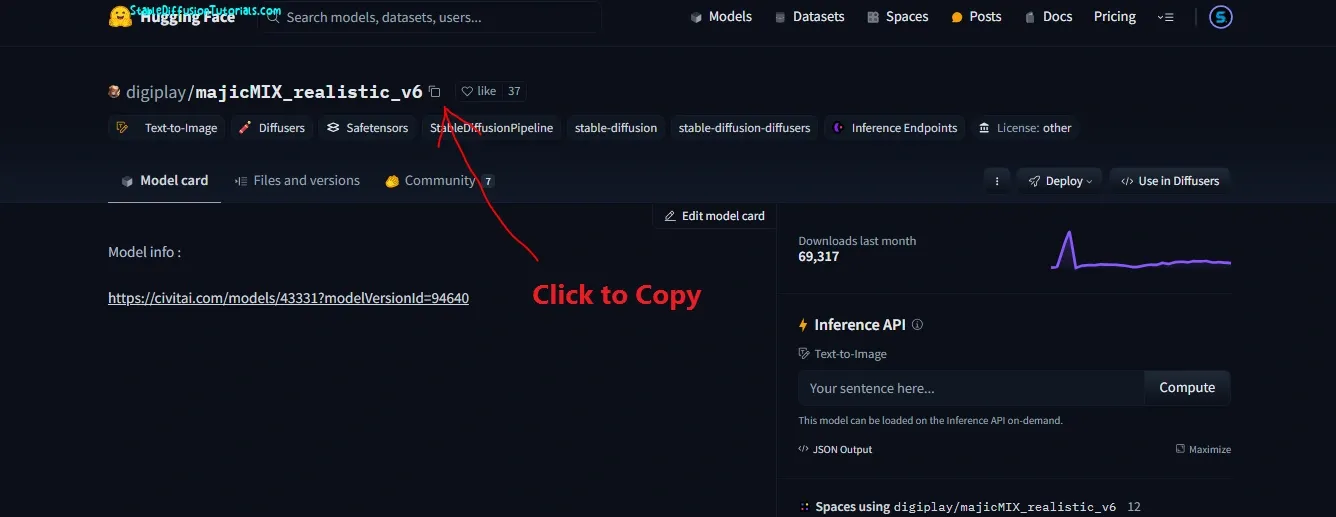
3. Now after selecting, a dashboard will be opened. Just copy its Hugging Face ID.
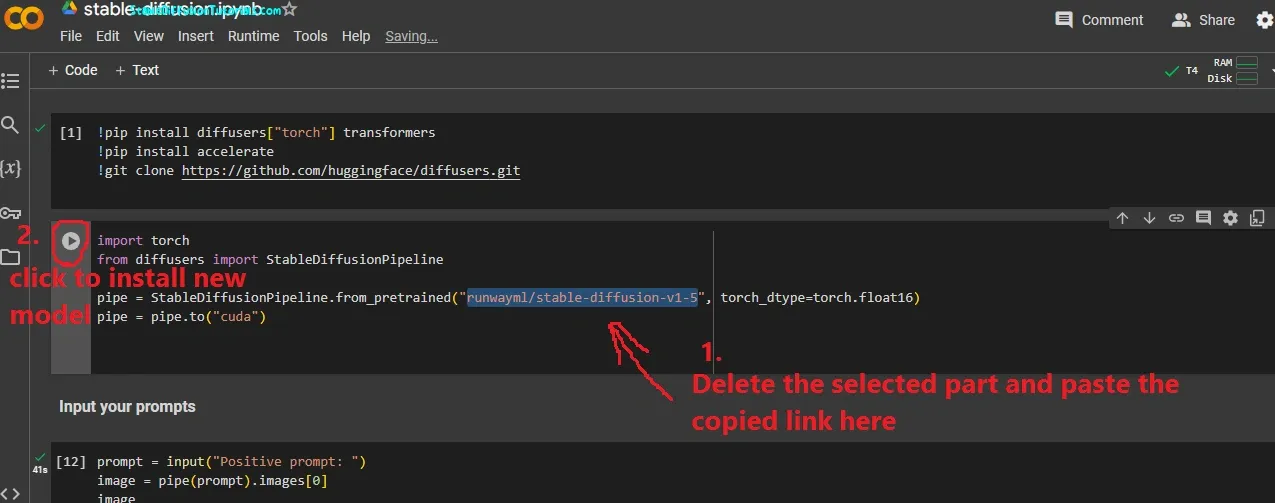
4. Move to your Google Colab notebook file and replace the old ID(placed in between the inverted comma) with the new ID by pasting it there like we have shown in the above image.
5. Now click the “Play” button available on the left side panel to download the selected model. Wait for a few minutes to get it installed. Then just put your positive and negative prompts.

Now, you can see the results are quite incredible. The girl’s face, eyes, and color look so realistic, detailed, and beautiful.
Why,
Because we are using the pre-trained “majicMix_realtistic_v6” model for generating the specific types of images that have been trained with particular Asian faces set of the data set. so, whenever you feed the prompt into this model it will generate the images with Asian faces.
Many popular models have been released that will blow your mind like Dreamshaper, Juggernaut XL, etc. can be downloaded from CivitAI or the Hugging Face platform.
Downloading SDXL1.0 model:


Explanation of Code for Diffusers library:
Here, the following code will
help to install the Pytorch library helps run and control the
GPU(Graphical processing unit) acts as the bridge between the Python codes and
the hardware. Here, we are using “!” (exclamation) before every block of code to run on Colab and see the installation status on the cell itself.
!pip install diffusers[“torch”] transformers
This code installs the diffusers and the pytorch library helps to
leverage the power of GPU for generating AI images.
— Now, install accelerate by copy paste the following
code.
!pip install accelerate
This is also the
prerequisite for pytorch library to work better with GPUs.
!pip install github.co/huggingface/diffusers
What this does is it simply download and install the main
version which has no bugs and is well-tested in the Alpha and Beta testing environment.
import torch
The above code is for installing pytorch
from diffusers import StableDiffusionPipeline
Next is to set up the stable diffusion pipeline for generating the image where we can input prompts.
pipe = StableDiffusionPipeline.from_pretrained(“runwayml/stable-diffusion-v1-5”, torch_dtype=torch.float16)
This is for passing the model to be installed and downloaded for using it to generate an image.
pipe = pipe.to(“cuda”)
Passing Cuda to set the GPU
prompt = “a photo of an astronaut riding a horse on mars”
Using “prompt” variables, we are passing the prompt and storing it.
image = pipe(prompt).images[0]
Storing generated results into the “image” variable by accessing its index value.
Conclusion:
Stable Diffusion is the open-source image generation latent diffusion model which we can take advantage of by installing into locally or on Colab but the Stable Diffusion WEbUI has been banned by Google Colab due to its large consumption of resources.
But, we can use Diffusers without any disconnects in Google Colab and generate our image art for free.


